Showing posts with label Winter Floral. Show all posts

Friday, January 5, 2018

Power Poppy's January Power & Spark Challenge with CardMaps!


Hello there and Happy Friday to you!  Today I have a special post.... this week Power Poppy teamed up with PageMaps by Becky Fleck to bring you some card samples using Becky's CardMaps wonderful card sketches!  AND it just so happens to coincide with our January Power & Spark challenge so that crafty and clever Julie Koerber has come up with an incredible challenge theme for you!  Just take a lookie at this...


And here is what Julie has to say about her challenge...


For this month's Power & Spark Challenge, we're asking you to "Grab A Map," and get in on some Power Poppy Fun! We've teamed up with Pagemaps.com's CardMaps to showcase 10 new sketches featuring some of Power Poppy's fabulous stamp sets. You can find all ten sketches along with design team samples HERE So grab a map, use it to spark a little cardmaking creativity and then, link your creation up HERE. If you play along, you'll be in the running to win a $50 Shopping Spree to the Power Poppy Shop! But wait, there's more! Becky Fleck, the fabulous Pagemaps guru, is also offering a $25 Power Poppy gift card and all you need to do is leave a comment on THIS post! The Pagemaps contest closes January 22nd, so hop on over soon! We can't wait to see what you create. 

Now doesn't that sound like fun?!  Here is the sketch I was given...


I just l-o-v-e square cards so this sweet sketch was right up my alley!  For my card, I chose to use Power Poppy's Bloomin' Wonderful stamp set for my image and paired it with the "Sending Love" sentiment from the Dynamic Duos: Glads and Gerberas stamp set.


My card base is actually a tag die but I thought it would make a fun card shape!  I stamped my image with Memento's Tuxedo Black ink on to a die cut and stitched card stock/patterned paper panel and colored it up with Copic markers.  Next, I die cut my sentiment pieces, stamped my sentiment, sponged on a little ink and assembled the layers.  Lastly, I adhered everything to my card base.  Oh, I did also add some shimmer with a Wink of Stella Clear brush pen.  Gotta have some shimmer on those blooms, right? ;) This finished card measures 3 5/8" x 4".


Just check out all of the beautiful little details in this bouquet!  That Marcella doesn't miss a thing, does she?  :)  Isn't this the perfect little winter floral arrangement?

So that is all for my card today, but several of my Bloomie AND Instant Gardener sisters have created some beauties for your card making inspiration.  You can see the link list here.  Make sure you leave a little blog love while you are there and then c'mon and play along with us!  Make sure you link up your CardMaps sketch inspired card for a chance to win a $50 shopping spree in the Power Poppy store!  Thank you so much for stopping by today and I hope to see you again soon....until then, take care!

~Katie

Supplies used:  Ink-Memento's Tuxedo Black, Ranger Distress ink in Tumbled Glass; Paper-Classic White card stock from Flourishes, patterned paper from My Favorite Thing's "Plaid Patterns Merry & Bright " 6x6 paper pad, Lucky Limeade card stock from Stampin' Up!; Other-Tag Sale Quilted die from Papertrey Ink, Stitched Square die from My Favorite Things, Classic Circle and Scalloped Circle dies from Spellbinders, Wink of Stella Clear brush pen, and these Copic colors-BG0000, BG000, BG01, BG02, B60, B63, B66, B69, B79, BV0000, BV00, BV13, C1, C3, C5, W1, E55, E71, E74, E79, YG0000, YG21, YG23, YG25, YG61, YG67, Y13, and RV02.

Friday, December 22, 2017

Wishing you a Merry Christmas with a Power Poppy favorite!


Hello there and happy Friday to you!  Can you believe that we are just a few short days away from Christmas??!!  Where did this year go?  Do you feel like we must've missed a couple of months along the way too?  How in the world are we already so close to the end of another year?  To wrap up the crafty year at Power Poppy, our darling Julie Koerber thought it would be fun to highlight a favorite past Christmas project.    I can think of oodles of Christmas favorites that I have seen my incredible Bloomie sisters create....I mean, seriously....these ladies constantly amaze and inspire me!  Not to mention our dear Bloom Whisperer herself, Marcella, from whom all swoon-worthy, amazingly detailed, and  gorgeous botanical images flow.  Where it becomes a little more difficult for me is when it comes to picking out a favorite project of my own!  Hmmmm, do you find that you too are way more critical of your own work?  What is up with that?  

So, for my favorite, I actually decided to choose a card that I really stepped out of my comfort zone on in terms of color choices.  What made me think of a black background for a Christmas card, I really can't say.  I can tell you that while I was coloring this card up, I must've asked myself a dozen times if I had lost my mind....I can also say that a couple of times when said background was looking quite scary, I came very close to filing it in the circular file....you know the file, right?  ;)  In the end, I am glad that I saw it through.  I will definitely try a dark, dramatic background again....and maybe next time, it wont be quite so scary. :)  In any event, the true star here is Marcella's incredibly gorgeous and truly dreamy image from her Winter Wonderland stamp set.  An inspiration from her own wedding bouquet, this Christmas bouquet is definitely a show stopper!  If you don't have this set yet, you really should add it to your "short" list!  :)    You can find all of the card details from this earlier post here.


Here is one last little lookie and this glorious image that Marcella has created just for us....


I am so happy you stopped by here today for a visit.  Please know that I am wishing you the Merriest Christmas ever.  I hope that you have an abundance of time spent with family and friends and also time to just relax and enjoy the true reason for this season.  Your visits here, as well as your encouraging comments and emails have meant more to me than you can imagine.  I am certainly feeling blessed for all of your kindnesses.  Enjoy this beautiful holiday and I look forward to your next visit soon....until then, take care.  :)

Cindy Lawrence    
Julie Koerber 
Kathy Jones 
Katie Sims <------You are here 
Stacy Morgan 
Tosha Leyendekker

~Katie

Monday, October 23, 2017

Power Poppy's Happiest Holiday 2017 Stamp Release~Day 8!


Hello there and welcome!  I hope you have been enjoying Power Poppy's Happiest Holiday 2017 stamp release thus far!  Haven't Marcella's images been incredible?  Well, hang on because today's set is really going to make your head spin....just take a look at this lovely arrangement inspired by Marcella's very own wedding bouquet, Winter Wonderland!


Now, how about that stunning bouquet?!  I'd say she saved the best for last, but honestly.....I think ALL of the sets are incredible, don't you?  :)  So for my card, I started by coloring this beauty up with  Copics then die cut the image out.  I kept the card design very simple so the bouquet and the beautiful scripty sentiment could really shine.  Speaking of the sentiment, it is on a strip of vellum to add a bit of a frosty texture for this wintry floral image.  My card base is from the same die set.  I decided to make the background really dark to pop the blooms out...so I swallowed hard and pulled out the  Copic N's and a bit of BV.  I will list all of the Copic colors below.  :)


This really is one of the most striking bouquets I have seen Marcella create.  As always, her attention to every teeny tiny detail makes coloring this up a pure dream!  Thank you, thank you, thank you....dear Marcella!  :)


One last look at this lovely image....I'll bet you are already writing this stamp set down on your wish list, right?  Well, that is all for my card today, but some of my Bloomie sisters have some pretty amazing creations to inspire you and entice you....lol!  Make sure you leave them a little blog love while you are there and also check out Marcella's post on the Power Poppy blog for details on today's stamp set.  I thank you for stopping by today, and I hope you can pop back in tomorrow for the Power Poppy blog hop showcasing the new images once more.....AND the really exciting part....all of the stamps will be available in the Power Poppy store!  Yay!  Until then, take care!  :)

Christine Okken     
Julie Koerber 
Katie Sims <------You are here 

~Katie

Dies set used:  Papertrey Ink's Noted: Scalloped A2 Vertical die set; Copics used:  C0, C3, C5, C7, N1, N2, N3, N5, N7, N9, BG90, BG93, BG96, BG99, YG0000, YG21, BV000, BV00, BV04, BV08, BV17, RV000, RV00, RV17, RV52, RV55, RV66, and RV69.

Friday, January 6, 2017

Happy Power Poppy Friday and a New Power & Spark Challenge!


Hi there and Happy Friday to you!  Are you ready for the weekend?  I know I am!  Today I have a card to share for Power Poppy's very first Power & Spark Challenge for 2017!  Our lovely and super sweet CAS card queen, Stacy Morgan, is the hostess this month and her challenge is Winter Blooms.  Just take a lookie at this....


Here is what Stacy has to say about her challenge:

"When winter comes, many of us long to say goodbye to the chill and say hello to those cheerful and fresh spring flowers! Did you know there are lots of blooms that sprout at the end of winter (you can cheat and include early spring as well)? How about camellias, crocus, paperwhites, holly, snowdrops, or poinsettias? Let's see how you can bring these pretty little petals and glorious greens to life and enjoy this last bit of winter as well!"

To make it super easy for you, here is a direct link of all Power Poppy winter blooms! 


For my card, I chose to use the gorgeous Simply Camellias stamp set.  I also used a sentiment from Tea in the Garden stamp set.  


I started by stamping my image with Memento Tuxedo Black ink and die cut it out with a die from My Favorite Things, Die-namics Cross Stitch Rectangle.  Next, I colored the image in with Copics and added a little gold leafing with my Krylon 18KT Gold Leafing pen.  After that, I die cut out my card base and a stitched panel using a Papertrey Ink die set, Noted: Scalloped A2 Vertical Die.  I also trimmed a couple of extra layers of paper using a paper trimmer.  I used some Chamomile and Chai ink from PTI to age the edges a bit.  Next, I started adhering my layers together, added some ribbon, button, and twine and then adhered it to my card base.  To finish off my image, I added some fine glitter to some of the petals then attached it to my assembled card.  There was no need for any stitching on my card, the dies did a beautiful job instead!  :)


Mercy, how I love camellias!  I actually have a few blooms on one of mine now!  I can never get enough of all of the glorious detail Marcella puts in each and every bloom.  What a dream this beauty is to color up!


Here is one last peek at my card.  The patterned papers are from  Anna Griffin's "Calisto" 5 x 7 paper pad I recently purchased.  I certainly hope that you enjoy this day and your weekend!  Please make sure you hop around and see what many of my incredibly talented Bloomie sisters have created for your Friday inspiration and then c'mon and play along with us this month for Stacy's wonderful challenge!  Don't forget to link up a picture of your card to the Power Poppy Blog for a chance to win a prize!  Thank you so much for stopping by and I hope to see you around again soon....until then, take care!

Cindy Lawrence    
Julie Koerber 
Kathy Jones 
Katie Sims <------You are here 
Stacy Morgan 
Tosha Leyendekker

~Katie

Supplies not listed above:  Paper-Rustic White and Spring Rain card stock from Papertrey Ink; Other- Spring Rain ribbon, fine linen button and scrap twine from PTI and these Copic colors:  BG0000, B000, B91, B95, E0000, E000, E41, E44, BV11, BV13, RV10, RV21, RV25, RV29, Y35, G29, YG61, YG63, YG67, and YG91.

Friday, December 23, 2016

Happy Power Poppy Friday and Merry Christmas to YOU!


Hello there, Happy Friday and Merry Christmas Eve eve!  ;)  I hope you have been doing well!  Today I have a little Christmas thank you card to share.  I used a couple of Power Poppy sets for this card, Merry Littles for the images and Nice Things to Say for the sentiment.  I tried to keep the card fairly clean and simple but towards the end, I added embossing and glitter....I guess it's just how I roll.  ;)


I have always loved all the little images in this set...you can have a lot of fun mixing them up.  I ended up with several images stamped out on my practice paper before I finally decided on a simple garland and single poinsettia bloom.  I stamped my sentiment and garland on a trimmed white card stock panel.  Then, I stitched a strip of patterned paper to the bottom of the panel.  Next, I stamped, colored, and fussy cut my poinsettia bloom, shaped the petals a bit, then added a little glitter.  After that, I added some pearls to the garland, a pearl to my bloom center and colored the pearls with Copic markers.  After adhering my poinsettia bloom to my sentiment panel, I added a some distressing ink to the edges and set it aside.  Next, I trimmed some lavender paper, ran it through my Grand Calibur with an embossing folder, added more distressing ink and some cream ink, then added some glitter to a few of the raised blooms and layered it on my card base.  Lastly, I adhered my sentiment panel to my card.  The finished card size is 3 1/2" x 4 1/8".  


I just love all of the detail that Marcella put in to this tiny garland and this petite poinsettia....such sweet little images!  Can you believe it, there is not a ribbon or button anywhere to be found....shocking, right?  :)

Well, that is all for my "merry little" card today but several of my Bloomie sisters have created some pretty spectacular projects for your inspiration, so make sure you pop over and check them all out...and leave a little holiday blog love while you are there.  I am so glad you stopped by for a visit today.  I wish each of you a Merry Christmas and many blessings for the upcoming New Year!  Your visits and sweet encouragement have certainly been blessings for me and I am so grateful.  Until next time, take care....

Christine Okken     
Julie Koerber  
Katie Sims <------You are here 
Stacy Morgan 

~Katie

Supplies not listed above:  Ink-Memento's Tuxedo Black, Versafine in Onyx Black, PTI's Chamomile, Chai, and Vintage Cream, Su!'s Lucky Limeade; Paper-Classic White card stock from Flourishes, Lavender Moon card stock from PTI, patterned paper from Heidi Grace; Other- WeRMemoryKeepers 1/2" corner chomper, pearls and embossing folder from SU!, glitter from Martha Stewart, and these Copic colors:  RV21, RV25, RV29, RV69, R39, YG21, and Y08.

Friday, November 4, 2016

Power Poppy's November Power & Spark Challenge


Hi  there and Happy Friday to you!  Today I have a really quick post to announce the newest Power Poppy Power & Spark Challenge.  The incredibly talented and super sweet card diva,  Tosha Leyendekker, is our hostess this month and she has a pretty sweet challenge for us.  Just take a lookie at this....


Here is what Tosha has to say about this challenge:

"I love vintage, so I often think of white and pink for Christmas decor.  I thought it would be fun to feature pink on a Christmas Card.  So, for this month's challenge, let's THINK PINK and make it a Pink Christmas." 


Now doesn't that look and sound like fun?  You can see all of the details on the Power Poppy blog.  Now, I need to start this off by saying that I had in mind to make a completely pink card.  As you can see here, things took a turn....as they often do in my craft room.  I think it still qualifies, because clearly there is pink...just not quite what I had planned for this card!  :)  I used the small lenten rose image from the Heaven and Nature Sing stamp set and stamped it on to a die cut that I left in the die to give me a nice clean border.  Next, I stamped the sentiment from the Wreaths Plain and Fancy stamp set.  After coloring in my image, I sponged some distress ink around, added some shimmer and shine, and then added gold leafing around the edge.  The rest of my card are some layers from white card stock and patterned papers.  I assembled the layers together and that was that...a pink-ish Christmas card!  :)  Still not sure how I arrived at this finished card when I had in mind an all pink card....does that ever happen to you? 


I love this sweet little lenten rose image and paired with the sprig of holly it makes such a pretty arrangement.


So that is all for my card today but some of my Bloomie sisters have some pretty awesome creations for your Friday inspiration so make sure you take a peek and would you leave a little blog love while you are there?  We'd love it if you'd play along with us too!  Link up your creation on the Power Poppy blog and you will be entered to win a prize!  Yay!  I'm so glad you could stop by today.  I hope you have a great weekend and until next time....take care!  :)

Cindy Lawrence     
Katie Sims <------You are here 
Stacy Morgan 
Tosha Leyendekker

~Katie


Supplies:  Paper-Rustic White card stock from Papertrey Ink, pink patterned paper from BasicGrey's "Serendipity" 6x6 paper pad, gold patterned paper from Carta Bella's "Beautiful Moments" 6x6 paper pad; Ink-Memento's Tuxedo Black ink, PTI's Smokey Shadow ink, Ranger Distress ink in Iced Spruce, PTI's Chai and Chamomile distress inks; Other-Gelly Roll clear glitter pen, Wink of Stella Clear brush pen, Ranger Glossy Accents, Krylon 18KT Gold Leafing pen, Spellbinders die set in Marvelous Squares, and these Copic colors-R30, R32, R35, R39, R43, R46, E50, YG00, YG01, YG61, YG63, YG67, YG91, G40, G43, G46, Yo8, Y19, and BV02.

Friday, October 21, 2016

Power Poppy's October Stamp Release Blog Hop!


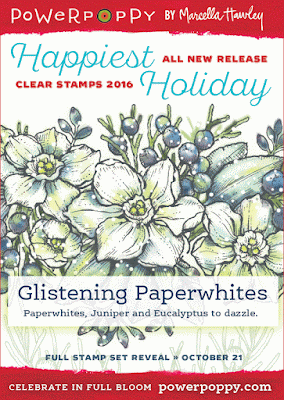
Hi there and a very Happy Friday to you!  Today marks the end of the Power Poppy October release which includes the newest additions to the Happiest Holiday clear stamp collection.  The Bloom Brigade is joining together for one last hop showcasing all of the new stamp sets.  Today is also the day that all of these amazing stamp sets are available in the Power Poppy store...more on that plus a little surprise at the end of this post!  Today, I chose to use the gorgeous set, Glistening Paperwhites....


Isn't this a glorious image?!  I am always amazed at the floral combinations Marcella creates....so very beautiful, so very elegant, and so very Marcella, don't you think?  I decided to go for a vintage and Christmas nostalgic look for my card.  I kept the card very simple and let the lovely image take front and center...well, a little off center actually, but I think you know what I meant!  ;)


I stamped my image and colored it up with Copics.  I also used a white pencil to add some highlights and soften things up a bit then sponged on some Ranger Iced Spruce Distress ink around my image to give it a little more depth.  After coloring, I added some ink spatters with a spritzing tool and then added some shimmer and shine with a few different pens and some Ranger Glossy Accents.  After all of that dried, I stitched on my patterned paper strip, sponged some ink around the edges, and tied on my ribbon.  I used a corner rounder on the top right corner, stamped my sentiment (also from this awesome set) and adhered this to a card base.  The finished size of this card measures 3 3/4"x 4 3/4".


I think I was able to capture a little of the sparkle of the card in this photo.  It really does glisten when the light hits it just right.  It reminds me of the cards we had when I was a little girl that had lots of sparkle on them.  Sweet memories of those Christmas traditions....

So that is all for my card today, but make sure you check out all of the card goodness from my amazing Bloomie sisters...and leave them a little blog love while you are there!  I hope you have enjoyed this release as much as we have enjoyed sharing our creations with you! :)  Make sure you check out today's post over on the Power Poppy blog too!  

Cindy Lawrence    
Julie Koerber 
Kathy Jones 
Katie Sims <------You are here 
Stacy Morgan 
Tosha Leyendekker

Supplies: Ink-Memento's Rich Cocoa, Versafine's Smokey Gray, Ranger Iced Spruce Distress Ink, PTI's Chai and Chamomile distress inks;  Paper-PTI's Rustic White card stock, patterned paper from Authentique's  "Nestled" 6x6 paper pad; Other-sheer white ribbon, Stampin' Up! Spritzer tool with Sahara Sand and Basic Gray markers, We R Memory Keepers Corner Chomper, Gelly Roll Clear Star pen, Wink of Stella clear brush pen, Atyou Spica Gold glitter pen, Ranger Glossy Accents, White Prismacolor pencil and these Copic colors:  YG61, YG63, YG67, BG72, BG90, BG93, BG96, BV0000, BV01, BV08, BV29, BV34, B23, Y13, Y15, Y26, W0, W2, C0, C3, and C6.


**As I mentioned at the beginning of this post, there is an extra little surprise for you!  Marcella has decided to have a little sale...just take a look at this....


And here are the deets from the Bloom Whisperer, herself...:)


Grateful For You - Two Special Offers:


Buy ANY 4 clear stamps and get the 5th clear set free! Enter discount code: INTHECLEAR at checkout
- OR - 
Buy ANY 5 digital sets and get the 6th one free! Enter discount code: DIGILOVE at checkout

These promotions are good on all in-stock stamp sets at PowerPoppy.com. Promotions cannot be combined in the same transaction. However, customers can complete one transaction for clear stamps, and one transaction for digital stamps if they would like to take advantage of both specials.
Offer ends Monday, October 25 at midnight central.

How about that?!  You know, you could get some great Christmas shopping done for the crafters on your list....or, for yourself!  :)  So happy shopping!  Until next time, take care!

~Katie

Friday, December 18, 2015

Happy Power Poppy Friday!


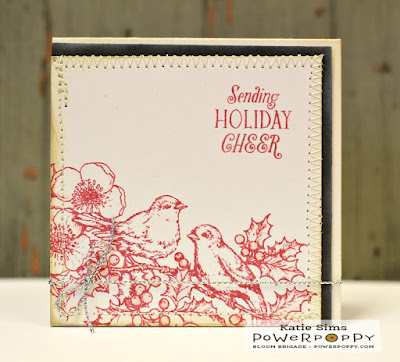
Hi there and a happy Friday to you!  Are you ready for Christmas?  Got all of your shopping done?  I am ready for time with family, but I still have some wrapping to do!  I have a quick little card to share with you today.  No coloring, no die cutting, no buttons......this came together in a snap!  I thought this sweet image from the Heaven and Nature Sing stamp set would be so pretty stamped in red.....and I love how it turned out.


I planned on adding some extras here and there but then changed my mind at the last minute and kept it really clean (for me, anyway).  The finished card is 3.75" square.  I stamped the image and then added the sentiment from the Bottlebrush Holiday stamp set in Memento's Rhubarb Stalk on to Papertrey Ink's Rustic White card stock.  I attached the image panel to a dark grey card stock (PTI's Smokey Shadow) layer and did some stitching around the edges.  Next, I adhered the panel to my card base.  I added some shimmer with a Wink of Stella clear brush pen  to the leaves, berries and parts of the birds and sponged on a little Chamomile ink from Papertrey Ink to give the paper an aged appearance.  Lastly, I added a bit of silver cord and some Ranger Glossy Accents to the berries.


To soften the gray card stock a bit I went back and sponged some Fresh Snow ink from Papertrey Ink.  I wish you could see the gloss and shine here....I really love how it turned out....I just had a hard time trying to capture it in a photo!  I have always loved this image and even though it really is so much fun to color, I have to say that I think this really shows all of Marcella's fine details off beautifully!  Don't you think this could be the most gorgeous fabric?  A Christmas toile in Marcella's images....oh my!  I'm not sure my heart could take it!  ;)

Well that is all for my little card today, but please make sure you check out what some of my Bloomie sisters have created for you.....leave a little blog love while you're there too.  I am so glad you were able to stop by for a visit and here's wishing you the merriest of Christmases!  Until next time, take care!  :)

Christine Okken     
Julie Koerber 
Kathy Jones 
Katie Sims <------You are here
Leslie Miller 

~Katie

Friday, December 4, 2015

Ready for a little Power & Spark?


Hello there and welcome to my little blog today!  I am so glad it's Friday, how about you?  I have a quick post to share with you today.  Power Poppy is introducing its last Power & Spark Challenge for 2015 (where did this year go!?).  December finds many of us reflecting back on all of the events of the year as we look forward to the beginning of a new year and this challenge totally embraces that tradition.....so are you up for a little Power & Spark "Rewind"?  This month, you get to pick a previous 2015 Power & Spark challenge and create a project!  That's it!  How easy is that, right? You can see the whole line up of Power & Spark Challenges for the year on the Power Poppy blog.


  For my project, I chose to take another look at October's challenge "Bits and Pieces" hosted by the incredibly talented and super sweet Julie Koerber.  This card may look a little familiar to you....it is definitely a rewind of the challenge but also of a card I created for October's Blog Hop...I just changed the theme to Christmas and the orientation a bit.  You can see that card here.


I have been wanting to color up the gorgeous image from the Poinsettia stamp set in white for quite a while.  This card used minimal supplies.  I started by stamping my image with Memento's Tuxedo Black ink on to some Rustic White card stock from Papertrey Ink.  I colored my image with several Copics that I will list below. Then, I stitched on a panel of patterned paper from Carta Bella's "Christmas Day" 6x6 paper pad.  Next, I rounded the top left corner with my We R Memory Keepers corner chomper and sponged on some Papertrey ink in Chamomile and Chai.  For a little extra somethin'-somethin', I spritzed some ink from Stampin' Up's Soft Suede, Crumb Cake, and Mellow Moss markers.  After that, I stamped my sentiment from the Botanical Tree stamp set with Papertrey Ink's Scarlet Jewel ink.  I went over the poinsettia and pomegranates with my Wink of Stella Clear brush pen and added some Ranger Glossy Accents to the center of the Poinsettia.  All that was left was to tie my ribbon (also PTI's Scarlet Jewel in grosgrain) and adhere the panel to a card base.  


I will never get enough of all of Marcella's beautiful details in her images!  This poinsettia is one of my all time favorites.....this bloom practically leaps off the paper when you stamp it, coloring it is the icing on the cake!  :)  

So, that is all for my card today, but please make sure you check out what several of my Bloomie sisters have created for your inspiration today.  Leave a little hello while you visit and then why don't you join in the fun, pick out your favorite theme, and create your own Power & Spark Rewind project!  I can't wait to see what you create!  Until next time, hope you have a wonderful weekend and take care!  :)

Christine Okken     
Julie Koerber 
Kathy Jones 
Katie Sims <------You are here
Leslie Miller 
Stacy Morgan 


~Katie

Supplies not listed above:  Stampin' Up Stampin' Chalk marker and these Copic colors- R39, R81, R83, R85, R89, BV02, G21, G29, YG91, YG93, YG95, YG97, E40, E44, Y26, YR31, C1, W4, W5 and 0.