Wednesday, September 12, 2018

Power Poppy's Natural Wonders Stamp Release~Day 1!


Hello there and welcome to Day 1 of Power Poppy's newest stamp release!  Marcella has been working overtime drawing up some of the most beautiful images ever....just you wait and see for yourself! 


Today's debut is the latest super sized bloom to join the XL Collection.  I know you remember those glorious, gigantic blooms of Dahlia XL, Poppy XL, and Tiger Lily XL.....well just get a load of Chrysanthemum XL!


Isn't she beautiful?  That is one seriously amazing mum!  For my card I chose to orient my image to one corner.    
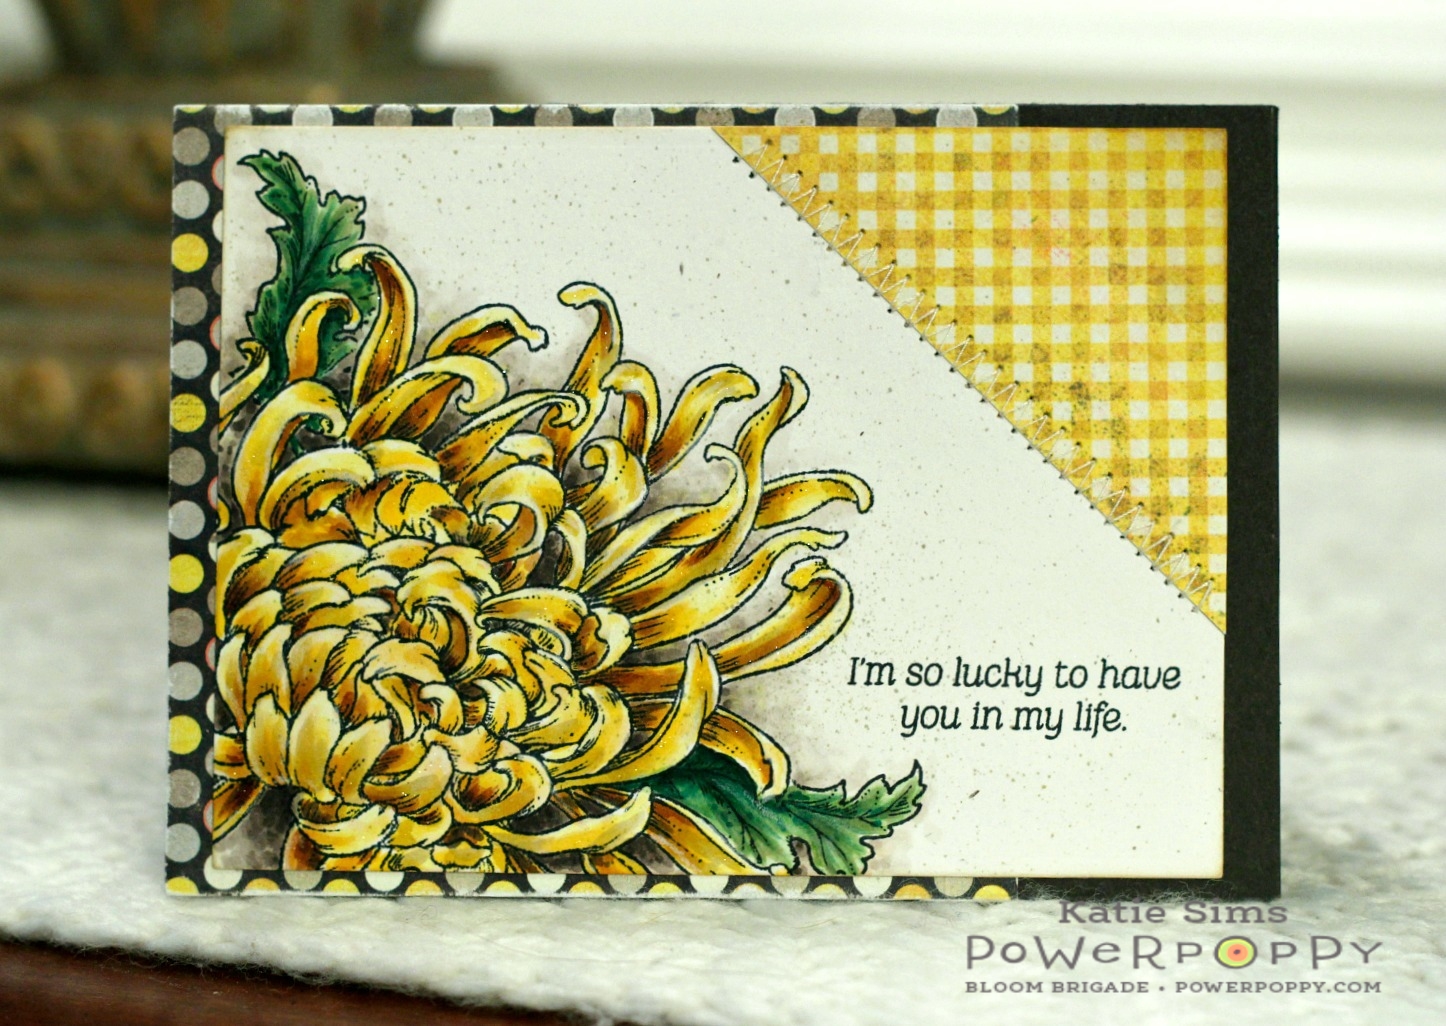


Once I stamped her up, I die cut the panel then colored her up with Copics.  Next, I stitched some patterned paper to the opposite corner and stamped my sentiment from the same set.  I added a little shimmer with a Wink of Stella clear brush pen and spritzed a couple of inks and sponged some distress ink around the edges.  To give a little more contrast for the petals, I used a white Prismacolor pencil.  Lastly, I added another patterned paper to my card base and attached the image panel.  This card measures 3 7/8" x 5 3/8" .


Oh, how I love this bloom!  And I can certainly say that she is a blast to color up!  Now I am ready to go mum shopping for our front door planters.  :)  

Well, this is all for my card today but my Bloomie sisters have really created some of the most beautiful cards for your inspiration and that Marcella is sure to have an amazing post over at Bloom Central to tell you all about her inspiration behind this lovely stamp set.  Make sure you leave a little blog love at your stops along the way.   I am so happy you could stop by today, and I hope you'll pop in tomorrow for Day 2 Power Poppy's Natural Wonders stamp release...I think you will be "hoppy" to see a familiar image making her debut in polymer.  :)  Until then, take care!


Cindy Lawrence     
Kathy Jones 
Katie Sims <------You are here 
Stacy Morgan 
Tosha Leyendekker

~Katie

Copics used:  Y11, Y13, Y15, Y18, Y26, G28, G40, G43, G46, YR24, YG91, E55, W0, W1, W3, W5, and W7.

Friday, September 7, 2018

Power Poppy's September Power & Spark Challenge~Let's Hit the Books!


Hello there and happy September to all of you!  Can you believe that we are already in to September?  Where did the summer go?   Although, I will miss those lazy summer days, I have to admit that I love Fall and all the wonderful things that come with the season!  Cooler temperatures, shorter days, falling leaves, football games, and the giddy feeling I get with the back to school rush.  Call me sentimental, but even after more years than I care to admit since I’ve been in school, I still feel the need to go shopping for pencils, pens, paper pads, books, and all of the fun little things that you do to prepare for a new school year!  It's also time for a new Power Poppy Power & Spark Challenge....and I get to be the hostess!  So how about a challenge that will inspire you to “Hit the Books”?  


You can use an image containing books, or how about a neat book print designer paper, or even create a book mark or book cover?  Whatever you decide, just make sure your inspiration is book related!  

So, for my project I decided to make a book cover and book mark.  Did you ever have to make book covers for your school books?  I used to look forward to covering and decorating my books each year!  I started by covering my little book with some craft wrapping paper and then made a belly band with a couple of patterned papers and some machine stitching for my book front.  Next, I printed an image and sentiment from Power Poppy's digital stamp set Apples in Season on to white card stock and colored it with Copics.  After die cutting my image, I layered it with some green card stock and adhered it to my book cover.


For my book mark, I die cut kraft and white card stock and stamped an apple image from the Farmer's Market stamp set and a sentiment from the Lilac Time stamp set.  After coloring the image with Copics, I assembled my book mark, added a bit of patterned paper and green card stock, and finished it with some ribbon.


Don't you just love those beautifully drawn apples and lovely sentiment?  The detail Marcella added to those apples is amazing!


I can't wait to curl up with my little book and "enjoy the moment"!  :)  That is all for my project today, but some of my Bloomie sisters have some lovelies to share with you so make sure you check them out and leave a little blog love while you are there.  I thank you so much for stopping by today and I hope that you will play along with us in our September Power & Spark Challenge this month.  Just link up your project on the Power Poppy blog for your chance to win a $50 gift code!  I can't wait to see what you create.  I hope you have a great weekend and I hope you will stop by again soon...until then, take care.  :)


Katie Sims <------You are here 
Stacy Morgan 


~Katie


Copic markers used for book cover:  R30, R32, R35, R37, R39, BV02, BV13, RV23, RV29, E40, E42, YG0000, YG21, YG61, YG63, YG67, YG91, G29, C00, C2, C4

Copic markers used for book mark:  R30, R32, R35, R37, R39, BV02, RV23, RV29, YG0000, YG21, YG61, YG63, YG67, G29, BG0000, BG000, B00, E40, E42, E44, E51, E55, E57, E59, 

Friday, August 17, 2018

Happy Power Poppy Friday~August 17!


Hello there and welcome back to another Power Poppy Friday inspiration post.  I sure hope all is well where you are!  All is good here....hot...and HUMID....but all good!  :)  Today I have a petite card to share with you using Power Poppy's Geraniums Take Two stamp set.


I started by stamping my image and sentiment with Memento's Tuxedo Black ink on to white card stock.  After die cutting my image, I colored it with Copics and added a little Ranger Distress ink in Antique Linen.  I also used some Papertrey Ink Chai and Chamomile inks then added some shimmer with a Wink of Stella clear brush pen.  I adhered my image panel to a die cut card base layered with a bit of patterned paper.  The finished card measures 3 1/4" x 4 1/2".


This image was a very quick color up....I stippled the blooms with a few shades of red....nothing precise at all...just some color to make them pop.  I just love this sweet scene....complete with a little spritz can!  I am always amazed at Marcella's creativity and attention to every detail.  :)


I couldn't resist one last close up of all of the beautiful details in Marcella's image....and that sweet little sentiment!  

So, that is all for my card today, but some of my Bloomie sisters have some beauties to share with you today.  Make sure you leave a little blog love for them when you visit. Also make sure you check out the Power Poppy blog for all of the latest goings on over there....so much to see!   I thank you  for stopping by today and hope to see you again really soon.  Until then, have a wonderful weekend and take care!  :)

Katie Sims <-----You are here

~Katie

Copic colors used:  R20, R22, R24, R29, R89, YG61, YG63, YG67, YG91, YG93, G28, E55, E59,  E93, E95, E97, E99, Y21, Y26, BG0000, B91, W1, W3, W4, and W7.

Friday, August 3, 2018

Happy Power Poppy Friday~August 3rd!


Hello there and Happy Friday to you!  I hope all has been going well with you!  I have a quick little card to share with you for today's Power Poppy Friday inspiration.  I chose to use the Simply Camellias stamp set for my image and the Soothing Sympathy stamp set for my sentiment.


I started by stamping my image with Memento's Tuxedo Black ink on a die cut of rustic white card stock.  After coloring the image with Copics, I stamped the sentiment then stitched a strip of patterned paper down the left side.  Next, I added some shimmer with a Wink of Stella clear brush pen.  All that was left was to add a bit of sheer ribbon and adhere it to a card base.  The finished size of this card is 3 5/8" x 4 7/8".


So that is all for my card today but a couple of my Bloomie sisters, Kathy Jones and Cindy Lawrence, have some pretty amazing creations for your Friday inspiration so make sure you check them out...and leave a little blog love while you are there.  And hey....today the newest Power & Spark challenge is being introduced.  The amazingly talented and Cindy Lawrence is our hostess this month so make sure you check this out over on the Power Poppy blog!


Thank you so much for stopping by today and I hope to see you again soon....until then, take care! :)

~Katie

Copics used:  RV000, RV81, RV83, RV85, RV89, E000, E01, E42, E93, E97, Y15, G29, G40, G43, G46, YG91, BG0000, BG02, B000, B00.

Friday, July 13, 2018

Happy Power Poppy Friday~July 13th!


Hello there, friend!  I hope all has been well with you.  It's been great around here....just hot!  And humid!  You know, the typical Georgia summer!  :)  I have a few flowers blooming right now that really don't mind the heat....some lavender Phlox and Black Eyed Susan... and I am enjoying what blooms the deer have left for me....lol.  We have a family living in the back yard between us and our neighbor.  The mama brought her baby to our front porch earlier this week. Oh how precious that baby is right now, all long legs and wide eyes!  Even though sometimes their dining on our flowers can be a problem, we still enjoy seeing them each year.  


I do have a card to share with you today using two of Power Poppy's stamp sets, Poppies for the image and Nice Things to Say for my sentiment.  


I started by stamping my image with Memento's Tuxedo Black ink onto some white card stock, then colored it in with Copics.  Next, I added a strip of patterned paper with some stitching and stamped my sentiment.  After that, I spritzed a few inks around, added some shimmer with a  Wink of Stella clear brush pen and also added a few highlights to the flower centers with a white pen.  All that was left was to adhere the panel to my card base.  This card measures 3 1/8" x 4 3/8" .


I just love this sweet little sentiment!  And check out all of the detail on those poppies....Marcella always gives us such great shading cues in her images!  :)

So that is all for my little card today but some of my Bloomie sisters have some cards to inspire you today so please make sure you check them out and leave them a little blog love while you are there!  I thank you so much for your visit today, and I hope to see you again soon....until then, take care!

Cindy Lawrence     
Katie Sims <------You are here 
Stacy Morgan 


~Katie

Copics used:  R00, R11, R12, R14, R17, R29, BV23, BV29, BG0000, BG000, BG01, YG01, G40, G43, G46.

Friday, June 29, 2018

Happy Power Poppy Friday~June 29th!


Hello, hello, hello!  Happy Friday to you and welcome for a slightly delayed Power Poppy Friday post!  I hope this lovely day finds you well.  I have a quick little card to share with you today using Power Poppy's new set, Hellebore and Hyacinth, paired with a sentiment from the Nice Things to Say stamp set.  

For my card I stamped the hyacinth image onto white card stock with Memento's Tuxedo Black ink, colored it with Copics, and die cut it.  Next, I stamped my sentiment and stitched a little patterned paper in the corner.  Lastly, I adhered the image panel to my card base.  This card measures 5" x 3 5/8".  


I have to say, I was really excited to see these previously digital images make it to a clear stamp set.  Don't get me wrong, digis are wonderful, but there is just something so  special about stamping it out, don't you think?  :)  As always, the incredible detail that Marcella added makes this a snap to color up!

So that is all for my card today, but some of my Bloomie sisters have some Friday inspiration for you, so make sure you check it out and leave a little blog love while you are there.  Make sure you check out the Power Poppy blog too for all the latest happenings at Bloom Central!  :) I hope you have a great day AND weekend.  Hope to see you around again soon...until then, take care!  :)


Cindy Lawrence    
Katie Sims <------You are here 
Stacy Morgan 

~Katie

Copic colors used:  R30, R32, R35, R37, R39, BG0000, BG000, BG01, C1, C3, C5, C7, C9, E40, E42, E44, E47, G40, G43, G46, G20, YG61, and YG91.

Friday, June 8, 2018

Happy Power Poppy Friday with The Daily Marker!


Hello there and happy Power Poppy Friday to you!  Today is pretty special because several of the Power Poppy designers are hopping with The Daily Marker for the latest 30 Day Coloring Challenge!  Have you ever played along in this?  The incredibly talented and oh-so-engaging Kathy Racoosin hosts this wonderful challenge to encourage all of us to take time to color....even if it is for just a few minutes a day!  What a great idea!


So in the spirit of this challenge,  I have a few stepped out photos of part of the coloring for my card.  This is the first time I have attempted to step out coloring photos, and to be honest, I had already colored up my foliage before I remembered to take photos.....so all I have is the bloom that I colored.  I chose to use Power Poppy's new stamp set Abundant Petals and the companion dies for my images and the Dream Wedding stamp set for my sentiment.


I started by using R30 to lay some color down.  I did not completely color my bloom but I will later.....I like to leave some white space at first because I can always go back and add more!  :)


Next, I added R32 to the areas that would naturally be darker or shadowed...again leaving a little room to add more later.


Then, I added R35 for even more depth...


After the R35, I went back with my R32  and R30 to smooth some of the brush strokes out and extend the color closer to the petal edges.


This next step with R37 and R39 are where I really amp up contrast which adds so much depth to the petals...it is now looking more dimensional...

***Pay no attention to the upside down marker in this photo or we could just call this my signature photo, right?  Sure, I meant to do that!  ;)


The last step is to smooth things out a bit with my R35, R32, and R30 and add a touch of V12 for a little more interest and to pick up some of the color from my patterned paper for my card.


And here is where this bloom is added to my die cut arrangement on my assembled card....


Using the accompanying dies for the image stamp set was so handy and made this arrangement a snap to cut out.  I wanted to play along with Power Poppy's latest Power & Spark challenge hosted by the super talented and equally adorable Stacy Morgan so I made a round card.  You have all month to play along with this challenge so check it out and don't forget to link up your entry on the Power Poppy blog....because a $50 shopping spree in the Power Poppy store is up for grabs!  :)


My card base is a couple of scalloped round die cuts in dark and light gray card stocks layered with a couple of patterned papers stitched together.  I did add some shimmer with my Wink of Stella clear brush pen to the leaves and petals.  Then I added some gold leafing around the image panel with a Krylon 18 KT gold leafing pen.  To give the gold leafing an aged look, I lightly sanded it.  I also added some sponging to the card with Papertrey Ink's Chamomile and Chai inks.  


And if this wasn't enough excitement, Marcella has a little something else to offer up...a BIG sale on one of her beautiful bouquet images!  In stamp form it is known as Burst of Kindness and in a digital format it is known as Spring Meadow Bouquet.....either way it is a GREAT deal!  So great, maybe you should just get BOTH!  :)  You can read all about this lovely bouquet, the sale, and see the Bloom Whisperer, herself, color up this bouquet in this post!


Whew!  We made it!  That was quite a long post!  Several of my Bloom Brigade and Instant Gardener sisters have some incredible projects to share with you today as well, so make sure you check them out and leave a little blog love while you are there.  I want to thank Kathy Racoosin at The Daily Marker for the opportunity to play along with her challenge today....what fun it has been!  I also want to thank you for stopping by today.  I hope you have a wonderful weekend and will come by again soon.  Until then, take care!


Julie Koerber
Cindy Lawrence
Tosha Leyendekker
Christine Okken
Barbara Walker
Nancy Sheads
Katie Sims <----- That's me! 
Elizabeth Zaffarano
Kathy Jones


~Katie