Friday, March 4, 2016

It's Another Power Poppy Friday!


Hi there and a very Happy Friday to you!  Do you have big plans for the weekend? I hope it includes a little crafty time.  :)  Today I have a card to share with you using Power Poppy's new set My English Rose.  I kept this card very simple in design so that big, beautiful rose bloom would be center stage....


I started by stamping my image with Memento's Tuxedo Black ink on to Papertrey Ink's Rustic White card stock and coloring it with Copics.  I ended up getting my rose a little on the dark side and tried to add some white highlights back in with a Faber Castell pen but it was a little low on ink so I made the fatal mistake of trying to just dab some white ink around with a sponge.....wrong move!  It whited out some of my detail and there was no getting that back so it is what it is at this point....sigh.  I went ahead and fussy cut my colored image out, added some shimmer with a Wink of Stella Clear brush pen and set it aside.  Next, I die cut my layers using Spellbinders Resplendent Rectangles die set and Papertrey Ink's Kraft card stock and also a bit of lined note paper from My Mind's Eye.  I used PTI's Fresh Snow ink to sponge around the kraft layers and then their Chamomile ink to sponge around the lined dp layer.  Then, I stamped my sentiment from the same stamp set using Versafine Black Onyx ink.  I sewed on a couple of buttons from PTI then assembled all of my layers on to my card base with foam dimensionals.  Lastly,  I used Collall to adhere my rose to my card.


I love all of the detail on this gorgeous Marcella image....just look at all of those layers of petals....and try not to notice the whited out details from my bad ink job....lol!  That is all for my card today, but several of my Bloomie sisters have created some pretty spectacular cards for your Friday inspiration.  Make sure you make the rounds and leave a little blog love while you are there.  Before I go, have you heard about the new Power & Spark challenge kicking off this month on the Power Poppy blog hosted by that oh-so-adorable Stacy Morgan?  Ooooo, this one's a goodie!


HOW TO PLAY:  The Peek-A-Boo is a special sketch challenge, where you create cut-outs on your card to share a snippet or give a “peek” of fun underneath! Stacy wants to let you know that even though the shapes in our sketch are circles, let your imagination flow and make them any ’ol shape you like! To prove this point, Stacy used hearts. Oh, she also wants you to use at least two panels as well, which makes sense with this peek-a-boo sketch!


Thank you so very much for stopping by today!  I hope you have a great weekend and until next time, take care!

Cindy Lawrence    
Julie Koerber  
Katie Sims <------You are here
Leslie Miller  
Tosha Leyendekker

~Katie

Copic colors:  YR30, E34, E40, E44, E47, E51, E93, G20, G29, G43, G46, and YG91.

Sunday, February 21, 2016

Power Poppy's February Blog Hop!


Hi there everybody and welcome back!  Have you enjoyed all of the Power Poppy festivities this week?  Boy, that Marcella really has outdone herself....yet again!  Guess what?  All of these new stamp sets will be available today in the Power Poppy store!  That's right...you can go make these sets your own today!  But before you do, the Bloom Brigade gathered for one last hop to preview the sets again....so let me show you my card before you jet outta here, k?  :)


I just had to use the large magnolia image from the Planning for Magnolias set....isn't she gorgeous?  I've said it many a time, but it bears repeating....that Marcella really knows her way around a bloom, doesn't she?!  There are sooo many varieties of magnolias...here in Georgia, they are everywhere!  In the spring, the tulip shaped magnolias really steal the show.  There is one tree that I make a point of driving by each season to see because it is so spectacular....and huge!  Here is a picture I took this past spring with my cell phone.....WOW, right?  :)  Oops, gotta little distracted there from my card, but I just had to show you this tree because she was the inspiration for how I colored up the blooms.


So, I stamped the image with Memento's Tuxedo Black ink onto white card stock and colored it with Copics.  Next, I fussy cut it out.....it took a wee little bit to do that, but I love how it looks on the card.  The card base is 4 1/4" x 5 1/2".  I layered an embossed panel from a Stampin' Up! embossing folder. Next, I used some new dies from My Favorite Things for the sentiment panel.  I stamped my sentiment from Happy Crabapple set with Smokey Shadow ink from Papertrey Ink.  The cross stitch edged die cut panel was antiqued by sponging on some PTI Chamomile ink and then I shaded it by sponging on Ranger Distress Inks in Weathered Wood and Milled Lavender.  I added an additional white panel edged with  my Krylon 18KT Gold Leafing pen between my sentiment panel and the scallop edged panel.  I sponged on some additional Chamomile ink onto all of my layers and then assembled them.  To adhere my fussy cut magnolias, I used Collal, which is amazing when you want to pop up your fussy cut items and give them some added dimension.  I kind of rounded some of the blooms around my finger before I adhered it down and the Collal keeps it in the shape that I molded it to.....pretty neat, huh?  Yep, I love that stuff!  :)


For the final bit of sparkle, I used my Atyou Spica clear glitter pen and my Wink of Stella Clear brush pen.....I don't think I was able to capture the sparkle in my photos, but it is there, I promise!  :)   I do want to mention that this may be my first card where there is not a trace of a button, or stitching from my machine, or ribbon....hmmm, eerie, huh?  I can't quite believe it either.  So there it is, my little card for the last hop of February's release.  I can tell you that my Bloomie sisters have been up to their usual brilliant card designing, so make sure you check out all of the gorgeousness that they have to share with you....and leave them a little blog love while you're there.  Thank you so much for stopping by today!  I hope you'll pop in again soon, and until then....take care!  :)

Cindy Lawrence    
Julie Koerber 
Kathy Jones 
Katie Sims <------You are here
Leslie Miller 
Stacy Morgan 
Tosha Leyendekker
and Marcella Hawley


~Katie

Supplies not listed above:  Paper- Papertrey Ink's Lavender Moon and Autumn Rose, Flourishes Classic White card stock; Other-My Favorite Things die sets in Cross Stitch Rectangles and Mini Scallop Rectangles; Copic colors-  RV0000, RV52, RV55, RV66, RV69, RV91, RV95, RV99, C00, BV000, BV00, E70, E74, E77, E79, G40, G43, G46, G28, Y02, YG21, and YG91.

Wednesday, February 17, 2016

Power Poppy's February Stamp Release-Day 2


Hello and welcome back for Day 2 of Power Poppy's stamp release!  What did you think of yesterday's kick off set, Planning for Magnolias?  Pretty amazing, right?  Well just wait...there is so, so much more to come this week!  Today's set is spectacular in its own right....Folk Heart.  I love, love, love I say, the darling folksy images in this set!  I am betting that you will too!  Let's take a look-see, shall we?  :)


Ok, so I couldn't help but do a little research on folk art before I started on this card.  A simple Google search landed tons of images in bold, bright colors for inspiration.  Then I noticed a cuckoo clock and ended up on clock sights trying to decide if a cuckoo clock might find it's way into our home.....still pondering that idea!  :)  So, after way too much time looking at photos, I started on my card.  The image is stamped with Memento's Tuxedo Black ink onto Papertrey Ink's Rustic White card stock.  I pulled out the big guns here and used my Marianne Designs Creatables die set~Anja's Squares......you know, the one I keep under glass in my craft room, have blogged about its amazing-ness on numerous occasions and limit myself to using because I want to use it all the time?  Yep, that one.....:)


While I was coloring my image, I started using some reds and greens that, while fine, did not give me quite the look I was going for so I used my colorless blender to lighten the greens and reds a bit and went over them with more orange-y reds and olive-y greens and that hit more the direction I had in mind.  Do you ever do that?  I mention it here, because when I list my Copics you are going to see some pretty strange color combinations and that is why!  I am going to list them all. :)  I colored up the darling bird with those cuckoo clocks in mind....still pondering a clock....

The layers are more Rustic White card stock, and some red and green card stocks that I had in my stash.....sorry, I don't know the names of the colors.  The heart is a Papertrey Ink tag die and that is where I put my sentiment, which is from the Good Thinking: Renewal stamp set.  Next, I assembled my layers with a couple of added ones from Spellbinders Classic Circles Large and Classic Scalloped Circles Large die sets.  Lastly, I added some sparkle with my Wink of Stella Clear brush pen, some white accents with my Copic Opaque White, and some shine to the berries with my Ranger Glossy Accents then added a couple of wooden buttons and hemp cord to finish things off......


Oh, I did use a little Papertrey Ink Vintage Cream and Chamomile inks to sponge around some of the layers to age it a bit.  I absolutely am head over heels for this sweet little bird!  Doesn't she look so cheery and full of song?!  I couldn't resist giving her a rosy cheek!  :)  All of the images in this set will certainly capture you heart, as they did mine.....just you wait and see!  And see, you shall.....thanks to my awesome Bloomie sisters and their incredible creations, you are in for a real treat!  Make sure you leave them a little blog love while you hop and then make sure you check back at Bloom Central (the Power Poppy blog) tomorrow for Day 3 of Marcella's wonderful new stamp release!  Thanks so much for stopping by today and until next time....take care!  :)

Cindy Lawrence    
Julie Koerber  
Katie Sims <------You are here 
Stacy Morgan 
Tosha Leyendekker
and Marcella Hawley

~Katie

Copic colors used-R05, R08, R11, R14, R17, R27, YG21, YG61, YG67, YG91, YG93, YG95, YG99, E50, E51, E55, E57, E59, and YR23.

Tuesday, February 16, 2016

Power Poppy's February Stamp Release-Day 1


Hello there and how are you?  I am so glad to see you here!  Today is the beginning of Power Poppy's February stamp release and just wait til you see all that Marcella has in store for you this week!  Oh, the beautiful images you will see.   Speaking of beautiful images...before we get started here for today's release, did you happen to catch the new digi image Flowers, Always that the incredibly talented Instant Gardeners showcased?   If not, you really must take a look....here is the link!  :)  Alrighty, well now it's time to introduce you to the first of Marcella's five.....yes, FIVE new stamp sets for February......say hello to Planning for Magnolias....


Hello beautiful, am I right?  Just wait til you see all of the images in this sweet set and it has some pretty amazing sentiments too!  :)  For today's card, I chose to use the darling garden planner that Marcella so lovingly illustrated.  Lemme show you.....


Is that not the most darling little planner evah?  Yep, I thought so too.  Wouldn't you love to just rummage through all the little pockets full of clippings, to do notes, washi tapes, and all of the other precious extras here?  The gorgeous magnolia clipping is the icing on the cake!  I started by stamping this image in Memento's Tuxedo Black ink on to Papertrey Ink's Rustic White card stock and coloring it up with Copics.  I will list the boat load of markers I used at the end of this post.  I coordinated my colors with the colors of my patterned papers from Echo Park's "The Story of Our Family" 6x6 paper pad.  I die cut my squares using dies from Spellbinders and My Favorite Things.  After fussy cutting my colored image, I added some sparkle with an Atyou Spica Clear glitter pen and a Wink of Stella clear brush pen and some shine with Ranger's Glossy Accents.  While everything was drying, I assembled and stitched my layers, stamped my sentiment with Stampin' Up!'s Midnight Muse ink, adhered a button and then adhered my image.  


Gah, this image is so sweet I can hardly stand it!!!  What fun it was to color up too!  :)  Now I want to start my own little garden planner/journal.  Let me just add that to my list of "to do's"...;)  I'll bet we all have a "list", don't we?  

So, that is all for my card today, but my Bloomie sisters have some a-mazing cards created just for your inspiration.  Make sure you leave them a little blog love when you visit and then make sure you tune in tomorrow for Day 2 of Power Poppy's February release! :)  Thanks so much for stopping by today and until next time, take care.

Cindy Lawrence    
Julie Koerber 
Kathy Jones 
Katie Sims <------You are here
Leslie Miller 
Stacy Morgan 
Tosha Leyendekker
and Marcella Hawley

~Katie

Supplies not listed above:  Dies-Spellbinders Grand Squares and My Favorite Things Stitched Squares; Other- Stampin' Up!'s Stampin' Chalk Marker in White; Copic colors- BG10, BG13, BG53, BG57, BG75, B91, B95, B97, E40, E42, E44, E50, E51, E55, E70, E74, E77, Y18, Y26, YR0000, YR30, YR31, YG61, YG67, R0000, R11, R14, R17, R20, R30, R32, R35, R37, R39, C3, and  C7.

Friday, January 29, 2016

Sending Love on Power Poppy Friday!


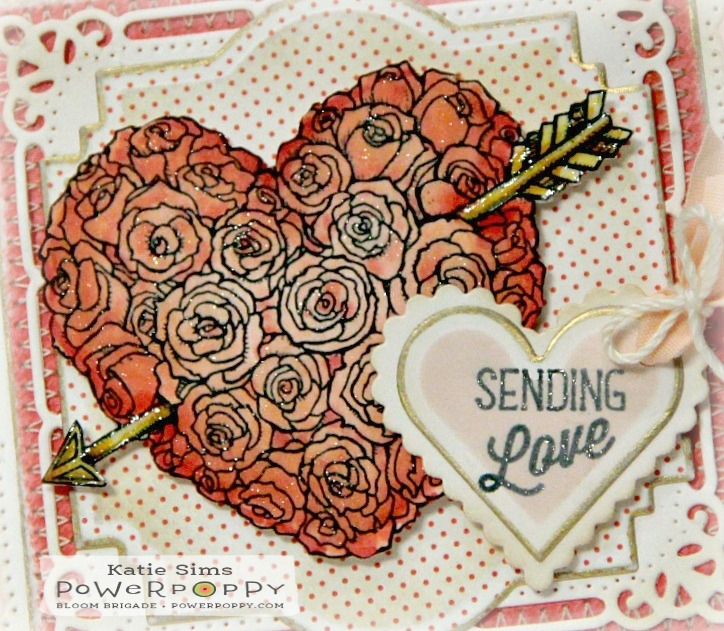
Hi there and welcome!  I hope you have had a wonderful week!  Do you have any special plans for the weekend?  Maybe a little crafty time?  :)  I found myself with a little time to play with Marcella's newest addition to her digital image collection, Follow Your Heart.  How sweet this image is....and just in time for your Valentine crafting!  :)  Let me show you what I created for today's Power Poppy post...


Yep, I am still crushing on this darling sentiment from the Dynamic Duos: Glads and Gerberas stamp set...and I think it is perfect for this little Valentine!  I started by printing my image on Papertrey Ink's Rustic White card stock and colored it up with a few Copics.  This image is a breeze to color...there is so much detail packed in that sweet little heart, just a few shades of coral red did the trick.  I added some shimmer with my Wink of Stella Clear brush pen then added some Ranger Glossy Accents to the arrow.  For my card shape and layers, I used Spellbinders Marvelous Squares and Labels Twenty Two die sets.  I did also use my paper trimmer to cut out a square of patterned paper that I stitched to my card base. 

 For my sentiment shape, I used Spellbinders die sets in Classic Heart and Classic Scalloped Heart.  I stamped my sentiment with Memento's Tuxedo Black ink, sponged on some Papertrey Ink's Sweet Blush ink and added some shimmer to the letters with my Atyou Spica Clear glitter pen.  Before I adhered all of my layers together, I added some gold detail to a few of the edges with Krylon's 18 KT Gold Leafing pen.  After the gold leafing dried, and took a fine grit sander and distressed it a bit...when you do that, it takes off some of the bright gold and leaves you with more of an aged look.  I decided the sentiment heart needed a little extra something, so I punched a hole in it and added some ribbon and string. Did I mention the bit of stitching?  No?  Well, I did add some zig zag stitching to the border just 'cause I love stitching on cards.  :)


This image reminds me so much of vintage valentines....and grade school Valentine parties complete with paper sacks to be filled with Valentines from all of your classmates....and all things lovey dovey....and cupcakes...ok, I think about cupcakes a lot anyway, but you get the idea, right? :)

So that is all for my card today, but several of my Bloomie sisters have created quite a display of gorgeousness for your creative inspiration....so make sure you check them out and leave a little hello while you are there.  I am so happy you could stop by for a visit today and I hope you have a wonderful and relaxing weekend!  Until next time, take care.

Cindy Lawrence    
Julie Koerber  
Katie Sims <------You are here
Leslie Miller  
Tosha Leyendekker


~Katie

Supplies not listed above:  Patterned papers from Carta Bella's "Merry & Bright" 6x6 paper pad; Chamomile distress ink from Papertrey Ink and these Copic colors- R20, R30, R32, R35, R37, Y13, Y15, YR24, Yand R27.

Friday, January 22, 2016

Wishing you a Rosy Friday!


Hello there and Happy Friday to you!  Did you happen to catch Marcella's newest digital image release earlier this week on the Power Poppy blog?  Mercy, those roses are incredible!  The Instant Gardeners had many beautiful cards to share and today, the Bloom Brigade gets to play with this beauty!  So. let's take a peek at Everything's Rosy, shall we?


I just have to say...this image was so.much.fun to color!  I decided to try and color up some of the roses like ones in my mama's yard.  She has one variety that has the most incredible yellow blooms with red-orange tinged edges.  I wish I knew what the name of that variety is!  This rose bush has gotten quite large and every year we find a bird's nest in its branches.  It blooms like crazy all summer and the blooms are so vivid in color.  I think I got pretty close to the colors for it here...the other blooms I colored are in a coral red hue.  The image was printed on Rustic White card stock from Papertrey Ink.  My Copics got quite a workout with this image....I will post the long list of markers I used below.  (My only defense is when I have an image of this magnitude, I get giddy and it brings out the little girl in me....you know, the one that wants to color with every crayon in the box.....lol!  Can you relate?) The mug on the left reminded me of an old metal mug, so I colored it up like that.  I consulted the a-mazing Jennifer Dove's Color of the Day color schemes and found one for aged tin that I thought would fit well here. I did add a couple of additional colors to give it a little extra age. :)

 Once I colored my image, I die cut it out using a Spellbinders Grand Squares die (the smallest one in the set).  Next I stamped the sentiment from the Poppies stamp set with Memento's Tuxedo Black ink.  I added some gold leaf edging to my image panel with a Krylon 18KT Gold Leafing pen and some sparkle to the blooms with a Wink of Stella Clear Brush pen.  The rest of the card is made using some layers cut with a trimmer to frame out the image panel.  The patterned paper is from  Teresa Collins' "Fabrications" 6x6 paper pad and the red card stock is Pure Poppy from Papertrey Ink.  The finished card is just shy of 5" square.


That Marcella really pulled out all of the stops for this stunning image...one bloom simply would not do!  No, she created five beauties complete with this darling cup and saucer, another charming mug, several rose buds and a few stray petals.....sigh......a bloom lover's dream image if there ever was one!  :)  I can practically smell the sweet, spicy scent of these lovelies, can't you?

So, that is all for my card today, but several of my Bloomie sisters have created cards a-plenty for your creative inspiration.  Make sure you leave them a little blog love while you visit, then if you haven't made this gorgeous digital image your own yet.....what are you waiting for?  It's available now.....just think, you could be printing and coloring this image up in a matter of minutes!  :)  I am so happy you were able to stop by for a visit and I hope you'll pop in again soon!  Until then, take care.


Cindy Lawrence    
Julie Koerber  
Katie Sims <------You are here
Leslie Miller 
Stacy Morgan 
Tosha Leyendekker

~Katie


Copic colors used:  R30, R32, R35, R37, R39, B63, YR23, YR30, YR31, Y15, Y19, E40, E41, E43, E44, E47, E51, E55, E57, E59, YG61, YG63, YG67, YG91, BG70, BG72, BG75, BG78, G20, G28, C0, C3, C5, C7, W00, W0, W3, and W5.

Friday, January 8, 2016

It's Power Poppy's January Power & Spark Challenge!


Hi there friends and welcome!  I hope you had a wonderful holiday season.  We certainly did!  It feels like it has been ages since my last post.  It was nice spending time with family and friends, but I was sure itching to get back to my craft room and play!  :) Today's project features Power Poppy's new Power & Spark challenge for January being hosted by the incredibly talented, super sweet card diva Tosha Leyendekker!  This one's a goodie.....let's take a peek, shall we?


Yep, it's a two 'fer!  For January, Tosha is asking us to "stretch" ourselves with this challenge...make a tall card and incorporate a new (for you) technique or new product!  If this doesn't get you to stretch your crafty muscles, I don't know what will!  So, for my card I patterned the design after another tall card I had made a couple of months ago and for my new technique, I decided to make my own patterned glitter paper.  


These gerberas from the Dynamic Duos: Glads and Gerberas stamp set always make me smile....they are so cheery and bright-eyed!  I colored the trio up with Copics and fussy cut them out.  I added some shimmer with my Atyou Spica glitter pens in clear and gold then added Ranger's Glossy Accents to the centers for more shine.  While that dried, I went to work on my background glitter panel.  I started by embossing some polka dots on white card stock.  Next, I die cut my rectangle, then lightly tapped my glue pad on the embossed panel.  Next, I added my glitter and shook off the excess.  Surprisingly, it worked pretty well.  I was kind of thinking I might end up with quite a mess, and I did have glitter everywhere (I think that is pretty normal when one is working with glitter though, right?)  but overall, I think it turned out ok.  I actually wanted to use a Versamark pad and heat and stick powder to adhere the glitter, but alas, my Versamark pad was dry!  Sooo, in came the glue pad.  I think you can see the glitter shimmer in the photos.  The rest of the card came together quickly with a couple of patterned papers, some stitching and then my card base.  The sentiment is from the same stamp set.  The finished card size is 3 3/4" x 6 7/8".  **Little tip here....If you want to make a card base that is larger than an 8 1/2" x 11" sheet of card stock will accomodate, try this.....instead of cutting then scoring your paper to make your card base from a single piece, cut two equal panels from your paper, on one of the panels score a horizontal line about 1/2" from the top and then adhere the two panels together at the top...instant card base!  You won't have a fold, but instead you will have your two panels adhered across the top....the score line you made will act as a hinge.  This does decrease the inside dimensions of your card, but not enough to really make a difference.  Then I just adhere my assembled stitched and colored card panel onto my card base....this keeps any stitching from showing on the inside of the card and makes everything all neat and tidy!  :)


Can you ever have too many polka dots?  Nah.... :)  These gerberas look positively prissy, don't you think?  Well, that is all for my card today, but as always, my Bloomie sisters have created some mighty spectacular cards for your Power & Spark inspiration....so make sure you take a peek and say hi while you're there.  Then, why don't you get crafting on your own masterpiece and come play along with us...the challenge runs all month and you could win a prize!  Yay!  We always love seeing what you create, so c'mon!  Thanks so much for popping in and I hope you'll stop by again soon...until then, take care!

Cindy Lawrence    
Julie Koerber  
Katie Sims <------You are here
Leslie Miller 
Stacy Morgan 
Tosha Leyendekker


~Katie
Supplies: Image and sentiment- Power Poppy's Dynamic Duos: Glads and Gerberas stamp set;  Paper-Rustic White Cardstock from Papertrey Ink, Red polka dot paper from Recollections,and blue print from My Mind's Eye; Ink- Memento's Tuxedo Black; Dies- Spellbinders' Long Classic Rectangles Large; Other- White Stampin' Chalk marker and Baja Breeze seam binding ribbon from Stampin' Up!, Atyou Spica glitter pens in Clear and Gold, Ranger Glossy Accents, Tsukineko's Essential Glue Pad, Martha Stewart's Glitter in Crystal Fine, Lifestyle Crafts "Spotted" embossing folder, and these Copic colors- BG70, BG72, BG75, BG90, BG93, BG96, BG99, R20, R22, R24, R29, R32, E02, E50, YG21, YG25, Y13, Y18, and Y26.