Friday, June 12, 2015

Power Poppy's June Power & Spark Challenge~Pencil Me In!


Hi there and a Happy Friday to you!  Can you believe it is already time for Power Poppy's Power & Spark Challenge again?  It seems we were just fussy cutting to our heart's content with this past challenge and now, that super sweet and amazingly talented Christine Okken has thrown down the gauntlet with this theme...


That's right....it's time to pull out those pencils (or in my case, I had to borrow some!)!  You can read all about this challenge on the Power Poppy Blog!  Now Christine can color with pencils like nobody's business so I know her project is going to be incredible and will definitely get you in the pencil spirit!  :)

I was still in the tag frame of mind, so I decided to make a tag for my card.  I used a Papertrey Ink tag die, then stamped my image and sentiment from Power Poppy's new Go Wild stamp set in StazOn Brown Timber ink onto Papertrey Ink's Rustic White card stock.  Next, I colored my image with some Prisma pencils that my good friend let me borrow for this occasion.  I have a few pencils that came over on the Mayflower and they were just not working out.  I used Gamsol to blend my colors together.  Now, I don't know if you've noticed, but I just don't use pencils for anything.  Me and my Copics have been inseparable for so long, that I really just don't use any other medium.  I have tried water coloring a few times.....it never went well. Then I got my Copics and never looked back...so, here is the first image I have colored with pencils in a very. long. time.  I definitely need more practice, but I really enjoyed the challenge of trying something new, and I think I'll be looking for some pencils soon....so if you have any suggestions on type or brand, I am all ears!  :)


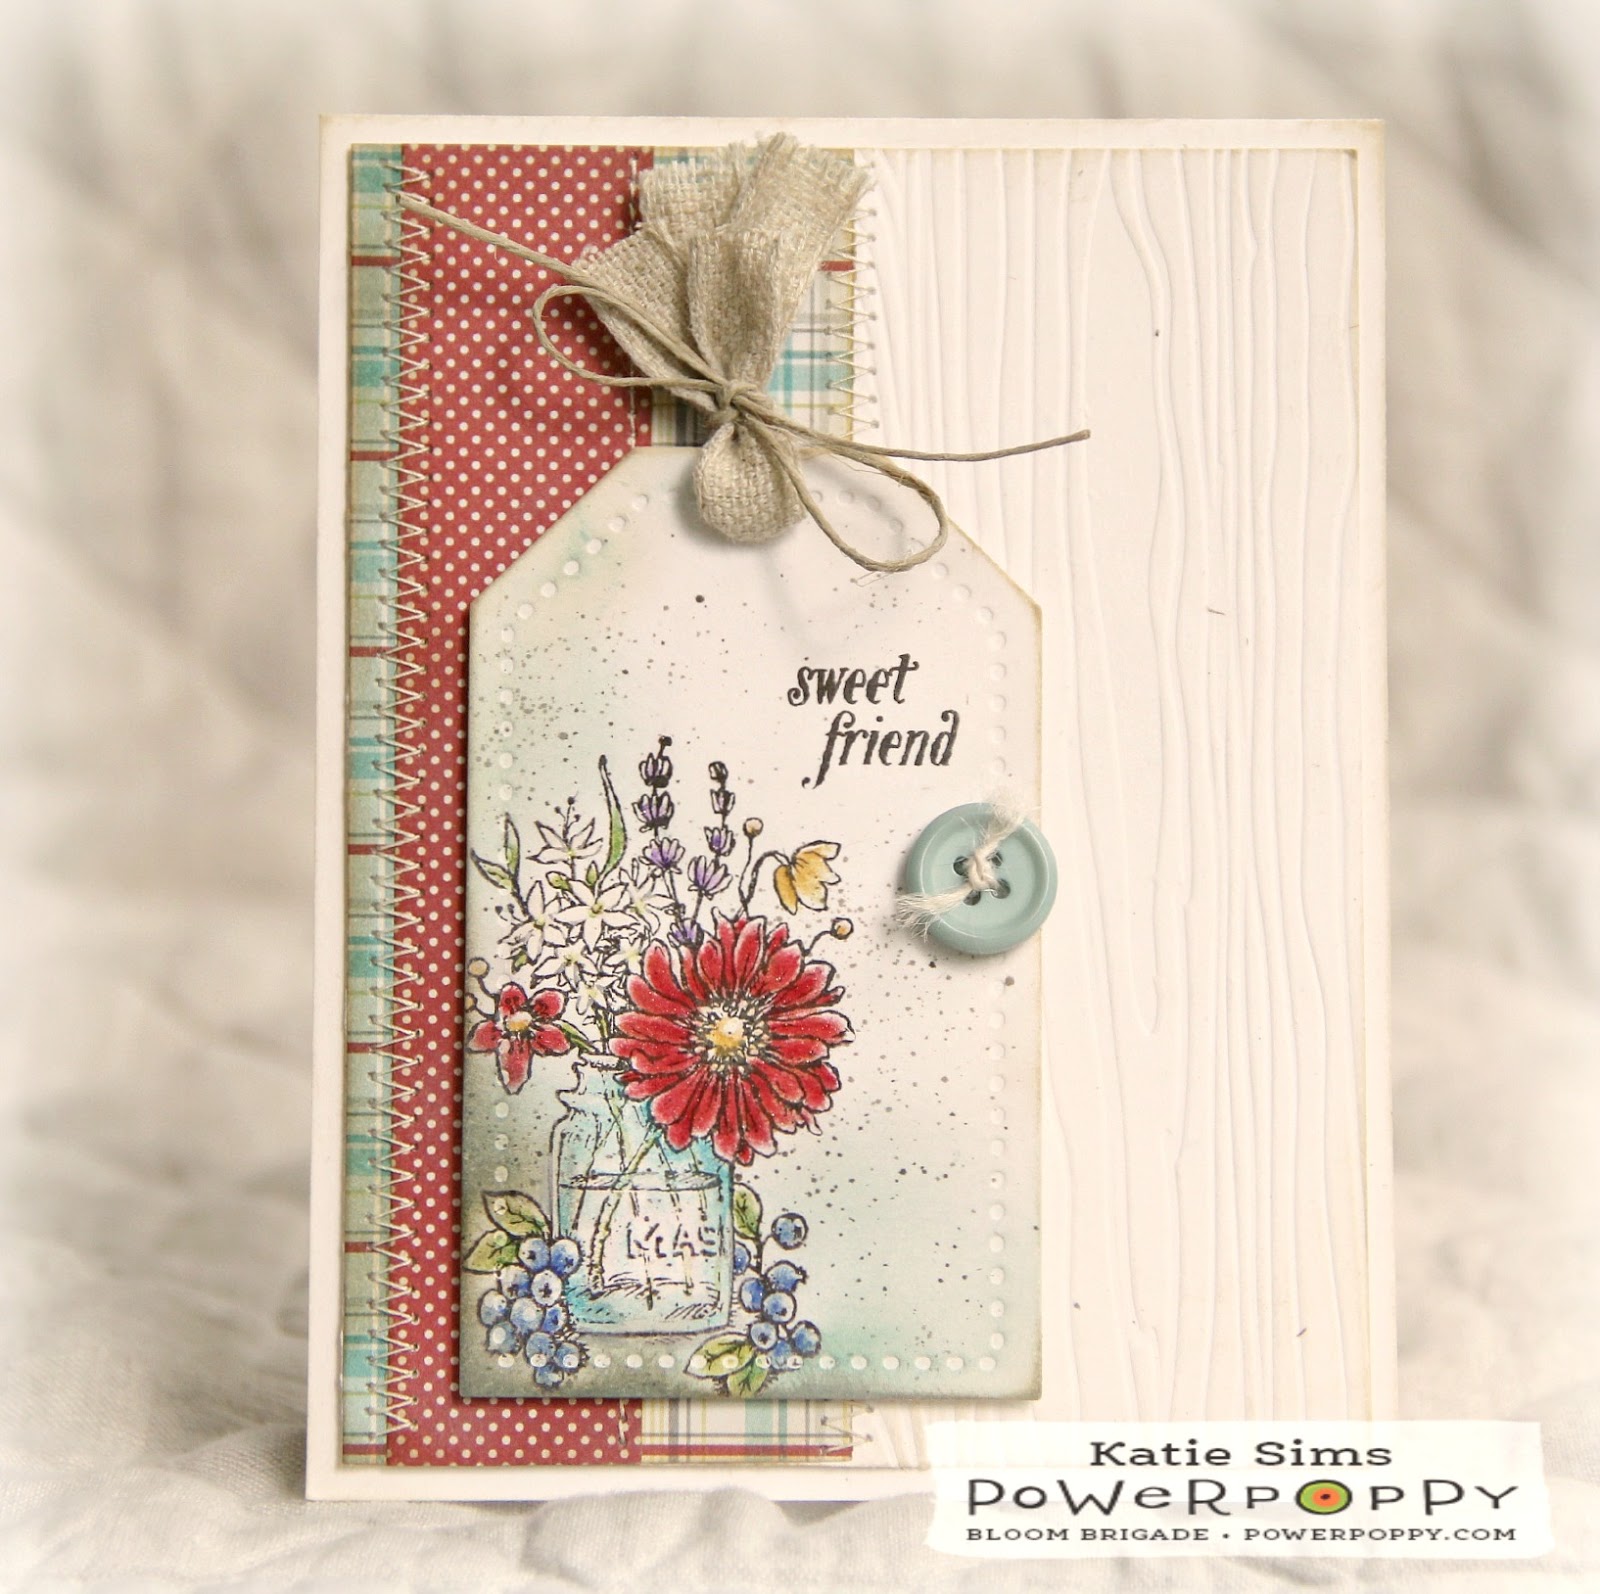
I added a few highlights here and there with a Stampin' Up! Stampin' Chalk White marker and used a Wink of Stella Clear pen to add some shimmer to the petals and jar.  My card base is A2.  My other layer is 4" x 5 1/4" and I embossed it with a Papertrey Ink wood grain texture plate. (Both of these layers were made with more Papertrey Ink's Rustic White card stock.)  I added a couple of strips of patterned paper from My Mind's Eye's Dilly Dally 6x6 paper pad, some stitching, and distress inks in PTI's Chamomile and Chai.  I also sponged on some Ranger Distress inks in Frayed Burlap and Evergreen Bough.  The ink spatters were made using a SU! spritzer tool with SU!'s markers in Soft Suede and Crumb Cake.  The ribbons, twine, and button were added to finish the tag off before adhering to my card panel with foam dimensionals.


I just love that little mason jar!  I have several old blue ones with the original zinc lids that were my husband's grandmother's.....they have a special place of honor in the kitchen china cabinet.  :)  Well, that is all for my card today....whew, it has been a big week for me....first Marcella has me coloring motorcycles and now Christine has me coloring with pencils!  :)  And no one is more surprised than me to read this, but I enjoyed every minute of it!  :)  Now, make sure you check out what my incredibly talented Bloom Brigade sisters have penciled in for you and then why don't you create your own pencil masterpiece and come play along with us?!  You could win a stamp set.....how's that for some inspiration?  ;)  Thanks so much for stopping by...I can't wait to see what you create, and until next time, take care!  :)


Christine Okken     
Julie Koerber 
Kathy Jones 
Katie Sims <------You are here
Leslie Miller 
Stacy Morgan

~Katie

Monday, June 8, 2015

Power Poppy's June Blog Hop!


Hello there and a very Happy Monday to you!  You know what today is, don't you?!  I'll bet you do, but I'll say it just in case.....today is the day of the June Power Poppy Hop and the day that all of Marcella's fabulous new stamps are available for purchase in the Power Poppy Store!  Woo Hoo!  But, before you go a-shoppin, how about we all go a-hoppin' and get one last look at these amazing new sets.  So ladies, let's HOP!  ;)


I just cannot get enough of Sage Advice!  Oh mercy, this set first caught my heart with that sweet colander of herbs, but the more I got to get those images inky......truth....I love each one of them equally....seriously, they are so. much. fun!  This is one of those special sets that just speaks to my soul.  For my project today, I thought that I would make a little trio of tags.  Tags are a great way of using up little bits of paper and ribbons that you just can't bring yourself to throw away....and if you saw the state of my craft table after this week's release, then you would completely appreciate the necessity for some serious table cleanin' and possibly an intervention! ;)   Also, tags work up really quickly, can be mass produced easily, can really dress up an otherwise ho-hum gift bag, and when grouped as a set....make an awesome gift for someone!  So, tags it is today!  :)


Can't you just see one of these on a cute little brown paper gift bag with some green gingham tissue paper?  These really took no time at all to make.....I die cut my tag using a Papertrey Ink tag die then stamped my images and sentiments in a variety of ways to mix them up a bit.  For the green colander tag, that is actually some kraft wrapping paper that I stamped the sentiment on....I crumpled it up first and sponged ink on it to make it look like a scrap from a paper bag.  The most time consuming part is figuring out what stamp to use where.  I stuck with a cream, olive, and brown color scheme for these "herb-y" tags.  Two of the tags could be used for baked goods and I purposely created one that could be used for gifting a plant.  That wee little pot of rosemary was just begging to be on one of these tags, and I happily obliged.  ;)   I think the real fun starts when you can start adding bits of ribbon or buttons or twine to really finish it off.  I have a serious love affair with rick rack and have had to limit myself or I would use it on everything....but this little bit on that tag makes my heart happy!


All of the images got the Wink of Stella Clear pen treatment....I really wish you could see how they shimmer!   Ok, now I'm ready to make a whole bunch of these!  So that is all for my project for today but make sure you check out what all of my uber-talented Bloomie team mates created for your crafting inspiration.....I know you will be amazed!  Leave them a little love while you're there and then, have a blast at the Power Poppy Store making some (or all) of these stamp sets your own!  Thank you so much for your visits this week!  I hope you enjoyed your time here as much as I've enjoyed your company.  I'll be back soon with another project to share and until then, I hope you have a wonderful week!  Until next time, take care!  :)

Cindy Lawrence    
Julie Koerber 
Kathy Jones 
Katie Sims <------You are here
Leslie Miller 
Stacy Morgan 
Tosha Leyendekker
and Marcella Hawley

~Katie

Supplies not listed above:  Paper- Rustic cream card stock from Papertrey Ink, scraps of patterned papers; Ink- Stampin' Up! inks in Old Olive and Early Espresso, Papertrey Ink's Chai and Chamomile distress inks, Vintage Cream ink from PTI.  Other- Cream grosgrain ribbon from Michael's, green and olive twine from  Stampin' Up!, hemp cord, button and  rick rack from stash, other ribbons from scrap.

Sunday, June 7, 2015

Power Poppy's June Release-Day 5!


Hi there and welcome to Day 5 of Power Poppy's June Stamp Release!  I hope you have enjoyed all of the festivities thus far.  Are you ready to see our last set for the release?  Well brace yourself for... Best Day Ever!  This set is chock full of darling images plus several fun and versatile sentiments.  Let's take a peek...


I had a really hard time choosing which image from the set I wanted to use for today's card, but I finally decided on this adorable hat, book, scarf and sunnies.....


Isn't this the cutest little summer scene?!  I started with some fun papers for my inspiration.  Next, I stamped my image with Memento's Tuxedo Black ink onto white card stock and colored it to coordinate with my papers.  I decided to paper piece the scarf so I choose a tiny polka dot pattern from another paper pad.  Then, I die cut my image with a Spellbinders Classic Circle Large die using the Out of the Box technique.  A little sponged on Ranger Distress Ink in Wild Honey and some Ranger Glossy Accents on the lenses finished off my image panel.  My card base is A2 size and layered with my patterned papers.  I used a Stampin' Up! punch for the scalloped edging and stitched my layers.  I wanted to stamp my sentiment directly on to my polka dot paper, so I sanded the area a bit to lighten it up before stamping.  To finish the card, I adhered all the layers and added some buttons threaded with hemp cord.


Don't you just love that sentiment?  And, how about that "juicy novel that I cannot put down".....how sweet is that?!  Doesn't this just put you in the mood to go grab a good book and find a comfy, shady spot and relax?  


Which way is the beach?  I'm ready!!  ;)  As you can see from my photos, I really got inspired by Marcella's beautiful image!  :)  Well, that's all for my card today, but make sure you check out all of the lovely creations from my Bloom Brigade sisters and Marcella's awesome inspiration post on the Power Poppy Blog.  I hope you can stop back by tomorrow as the Bloom Brigade has one last hop to showcase all of the new sets.  Here's hoping you have a beautiful day and c'mon back by tomorrow!  Until then, take care!

Julie Koerber  
Katie Sims <------You are here
Leslie Miller 
Stacy Morgan 
Tosha Leyendekker
and Marcella Hawley


~Katie


Supplies not listed above:  Paper- My Mind's Eye's Stella & Rose "Mabel" 6x6 paper pad, Simple Stories' SN@P! color vibe 6x6 paper pad, Flourishes' Classic White card stock, Papertrey Ink's Rustic Cream card stock; Ink-Papertrey Ink's Chamomile and Chai distress inks and Dark Chocolate dye ink, SU!'s Stampin' Chalk Marker; Other- Buttons from Papertrey Ink and these Copic colors:  E30, E31, E34, E35, E37, E39, E40, E41, E42, E44, E49, Y02, Y15, Y26, YR09, YR23, YR31, R01, R05, BG32, BG49, BG57, YG03, and YG93.

Saturday, June 6, 2015

Power Poppy's June Stamp Release-Day 4!


Hello there and a very Happy Saturday to you!  I am so ready for this weekend, how about you?  Well here we are at Day 4 of Power Poppy's June Stamp release....and let me tell 'ya, this set is really gonna blow your hair back!  ;)  Just get a load of Move the Soul...


Now you may be thinking, but it's not flowers....and you would be right...but I had an absolute blast with this set!!  When I saw this, I immediately thought of my nephew and started thinking about what kind of card I could make for him.  Now, if I know his Aunt Katie....and I think I do, then this will probably accompany a really cool Lego set that he and I can put together at his next visit.  :)  So let me show you what I created...


Why yes, that is a pterodactyl in the photo....right along with one of Uncle Matt's old penny racers and a couple of transformers.  How astute of you to notice....and I am sure there is one nine year old that is going to notice that too!  ;)  I couldn't resist gathering some of his toys that he has here to put in the photo!  

For my card, I picked out some really fun patterned papers as my starting point and then I did a little light coloring of my image to pick up the colors from the papers.  I stamped my image directly onto some notebook patterned paper.  This image was surprisingly easy to color...the sketchy lines of the image means you do not have to be exact which is a good thing!   Honestly, this image could be left completely uncolored and be fabulous!  Can you imagine it stamped on some kraft wrapping paper?!  Ooooo, may have to do that next to go along with the Lego set!


I punched a notebook paper edge with an old Stampin' Up! punch I had and stamped some stars that came in this set in different colors.  Now, the sentiment I had to give a special treatment to because "Let's Roll" is a phrase that my nephew uses a good bit when it's time to go somewhere (like Target aka The Mother Ship....land of all things Lego and Transformer).  So, I die cut a little band out and stamped the sentiment a few times.  My black layer is actually die cut from a postage stamp edge rectangle but I thought it made good tire treads!  I then stamped some for real tire treads on the sentiment strip.  My card layers are simple but I did do a little stitching because even though I know there is not a sewing machine in the land of all things automotive, his Aunt Katie apparently doesn't know how to make a card unless she does that, so she did!  :)


A few metal brads, a paper clip, and a bit of button, ribbon, and twine finish this off.  I did add some Wink of Stella to the chrome parts of the bike to give a little shine.  And there you have it, my very first motorcycle card....but definitely not my last!  I am always in need of masculine card stamps so this one will be really fun to stamp with and....thanks Marcella, for pulling me out of my flower box!  :)

So that is all for my card today, but remember...we still have one more day of stamp release THEN we all get together for one last blog hop to show off all of the stamp sets again.  Yay!  Make sure you check out what my awesome Bloom Brigade teamies made for your inspiration today and leave a little love while you're there and then I'll be looking for you tomorrow for Day 5!  Until then, take care!  VRRRROOOOMMMM!  :)

Katie Sims <------You are here 
Stacy Morgan 
Tosha Leyendekker
and Marcella Hawley

~Katie

Supplies:  Paper-  My Mind's Eye's Lime Twist "Out of the Blue" and Lost & Found "Market Street" 6x6 paper pads, Papertrey Ink's Rustic White card stock, Stampin' Up!'s Basic Black card stock; Ink-Memento's Tuxedo Black, Tsukineko's Versafine in Onyx Black, Stampin' Up!'s Poppy Parade, Island Indigo, Going Gray, and Lucky Limeade, Papertrey Ink's Chamomile and Chai distress inks; Other- Spellbinders die set A2 Fancy Postage Edge, Papertrey Ink's Photo Finish Strips die, Ribbon from SU!, button, string, and various brads from my stash, Wink of Stella Clear pen, Tim Holtz paper clip and these Copic colors: R22, R24, R29, R39, BG72, BG75, BG78, Y02, YG21, YG23, YG25, YG93, E000, E11, C0, C1, C3, C5, C7, W1, W4, and W5.

Friday, June 5, 2015

Power Poppy's June Release-Day 3 AND a Surprise!


Hi there and welcome back for Day 3 of Power Poppy's June stamp release!  I hope you have been enjoying the peeks so far.  Just think, we are only half way through too!  Today's stamp set has a bit of the familiar mixed with some fresh and new images....so let's Go Wild!


Now, before we really get going here there is something you should know....today is a very special day for one very special lady!  I think she thought that today's posts would go by with not a word mentioned but we just couldn't let that happen.....not when it's the birthday of the Bloom Whisperer, herself!  Marcella, I am wishing you a day full of all the things you love the most and here's to another wonderful year of good times, the love and support of family and friends, and more stamps!  Hee.....I just had to add that last little thing.... :)  Sending many hugs your way, birthday girl!

So, for my image I went for this sweet pitcher of roses and strawberries.  It made it's debut as a digi but now Marcella has given it a place of honor in this lovely set.  I stamped it off with Memento's Tuxedo Black onto white card stock and colored it with Copics.  Next, I added some Ranger Crackle Accents because I just didn't get enough of it on my card on Monday....:) and let that dry.  I die cut some layers for my card and made a simple square card base.  I stitched my patterned papers and added some distress inks to everything.  This sentiment stamp from the set is actually all on one line so I inked a portion of it at a time and stamped it on my oval die cut so it would fit in the space.  Once my pitcher was dry, I added gold leafing around the edge and used a hole punch to notch out a place so the image panel would fit snugly against my bow.  I assembled the layers and used foam dimensionals to pop up the image panel and sentiment oval.  


I also added gold leafing around the sentiment to give it a little extra shimmer.  Oh, and I used my Atyou Spica Clear glitter pen to add some shimmer to the blooms and berries.


One last peek.....


Make sure you check out all of the gorgeous creations by my Bloomie team mates for Marcella's big day!  Oh, and pop on over to the Power Poppy Blog and you can leave some birthday wishes there too!  Ok, three down and three more to go, so I hope you can stop back by tomorrow for a little bit of the unexpected.  If you listen really close, I think you can hear a faint chorus of "Bad to the Bone" playing....;)  Until then, take care!

Cindy Lawrence    
Julie Koerber 
Kathy Jones 
Katie Sims <------You are here
Leslie Miller 
Stacy Morgan 
Tosha Leyendekker
and Marcella Hawley


~Katie

Supplies not listed above:  Paper-Simple Stories "Summer Fresh" 6x6 paper pad, Flourishes Classic White card stock, Stampin' Up!'s Naturals White card stock; Inks-Ranger Distress Ink in Antique Linen and Scattered Straw, Papertrey Ink's Chamomile and Chai inks; Other- Marianne die set Petra's Square Frames, Spellbinders' Classic Squares Large set and Fancy Framed Tags Two set, Krylon 18KT Gold Leafing pen, Ribbon from Michael's, button from PTI, hemp cord, and these Copic colors:  YG61, YG63, YG67, YG91, BG93, BG96, W00, W0, W1, W2, W4, W5, W7, W8, C0, C4, C7, E11, E30, E35, E40, E50, E53, E55, E57, R21, R24, R29, YR30, Y15, Y21, Y26, and Y32.

Thursday, June 4, 2015

Power Poppy's June Release-Day 2!


Hi there and welcome back for Day 2 of Power Poppy's June stamp release!  How did you like yesterday's amazing Poppies stamp set?  That set makes me so very happy but I have to say...today's set is quite a beaut too!  Just have a look at Sage Advice...


When I first saw these images, I know I squealed.  I mean, is that not the most darling colander of herbs?!  The mixed fonts for the sentiments are pretty sweet too....I fell head over heels for the one I used for my card today.  So let me show you what I created....


I stamped my image with Memento's Tuxedo Black ink onto white card stock and colored my image up with a boat load of Copics .  Now, I have to give a shout out to the a-mazing Jennifer Dove and her Color of the Day ideas because I referenced that to color my colander.  She had some Copic color ideas that were perfect for what I wanted to do....so a huge thank you Jennifer!!  :)  

After coloring, I die cut my image out with a Spellbinders oval die and sponged on some Ranger Distress inks in Peeled Paint and Frayed Burlap then added a little Papertrey Ink Chamomile and Chai distress inks around the edges.  My card base is an A2 size cream card stock.  I cut a slightly smaller layer, used Stampin' Up!'s Vine Street embossing folder and embossed part of it and then stitched my patterned paper to it.  I stamped the sentiment in more Tuxedo Black ink and then stamped the little chive bracket with some Stampin' Up! Old Olive ink.  To finish things off I used my Wink of Stella clear pen to give some shimmer here and there to my colored image and to the little chive bracket around the sentiment.  I assembled my layers, using foam dimensionals to pop the image oval then added buttons and hemp cord to add that "one more thing" I thought it needed.  :)


Don't you just love the looks of old copper kitchen ware?  And all of those beautiful herbs with the wonderful detail that Marcella is known for.....does it make you wanna squeal too?  :)  I'm with ya....


You'll have to forgive my little photo shoot today....I had some extra time to take photos and I guess I got a little carried away.  I actually put this card in the antique china cabinet in our kitchen for the photos.....don't you think it looks right at home there?  That may be where it stays for a while!  

Well, that is all for my card today but my Bloomie sisters have created some mighty pretty cards for your crafting inspiration so make sure you to pay them a visit and leave a little blog love while you're there.  So glad you were able to stop by today for a visit and why don't you just come on back tomorrow for Day 3 of Power Poppy's June release.....I'd love to see ya!  Until then, take care!  :)
  
Julie Koerber 
Kathy Jones 
Katie Sims <------You are here 
Tosha Leyendekker
and Marcella Hawley

~Katie

Supplies not listed above:  Paper-Carta Bella's "Traditions" 6x6 paper pad; Flourishes card stock in Classic White and Classic Ivory; Buttons-Papertrey Ink; and these Copic colors:  E08, E21, E30, E35, E37, E39, E40, E41, E42, E43, E44, E97, YG21, YG23, YG25, YG91, YG93, G40, G43, G46, G82, G85, YR23, YR24, YR27, Y23, Y25, Y26, R02, R05, R08, BV00, BV04, BG93, and BG96.

Wednesday, June 3, 2015

Power Poppy's June Release-Day 1!


Hello there and a happy Wednesday to you!  I hope all is well with you and you are getting your summer off to a good start!  And speaking of a good start, today just so happens to be Day 1 of Power Poppy's June stamp release......oh, the lovelies you will see this week from that Marcella!  She has been hard at work creating the most gorgeous images to get your summer started right!  Today's featured set is the long awaited namesake.....Poppies.  Trust me when I say, this set has most definitely been worth the wait......wanna see?


Tears, right?  Yep, me too.  All of those gorgeous poppies and to really up the ante, Marcella put them in an old Chinese Ginger jar!  AND.....wait til you see all of the lovely sentiments and the other image in this set!  I know this is going to be a huge favorite with all of you...it already is one of mine!  :)  So, let me show you what I created....


I started by stamping my image with Memento's Tuxedo Black ink on to some cream card stock.  Next, I die cut it out using Spellbinder's Labels Twenty Eight and colored my image with many Copics that I will list below.  After I was done coloring, I sponged on some Ranger Distress Ink in Weathered Wood and edged it with my Krylon 18 KT Gold leafing pen.  Then, I added some shimmer with a Wink of Stella Clear pen and I added Ranger's Crackle Accents to the Ginger jar to give it a crackle texture.  I think you will be able to see it in one of the photos below.  To attach my ribbon, I punched two holes in one side and tied my bow.  My card base is made using some Poppy Parade card stock from Stampin' Up! (talk about a coincidence.....;)  I layered and stitched a couple of patterned papers from Authentique's "Carefree" 6x6 paper pad and adhered them to my card base, then attached my assembled image panel with foam dimensionals.  As a final touch, I added some white back in to the centers of the poppies with a Stampin' Up! White Stampin' Chalk Marker.


How 'bout them poppies?!  Marcella really gave them the royal treatment putting them in that gorgeous jar....and, to make this really special, the symbol on this Ginger jar means "Double Happiness".  Wouldn't that make a wonderful wedding or anniversary card?!  What a sweet detail Marcella added!  :)  Hopefully, you can see the crackle finish on my jar...


So that is all for my card, but you know that my Bloomie team mates have created some a-mazing cards for you to see so go take a peek, leave them a little blog love, and then I would love it if you could pop back by tomorrow for Day 2 of Power Poppy's June stamp release.  So glad you could visit today and until tomorrow, take care!  :)

Cindy Lawrence    
Julie Koerber 
Katie Sims <------You are here
Leslie Miller 
Stacy Morgan 
and Marcella Hawley

~Katie


Copics:  R01, R02, R11, R14, R17, R29, R59, BG72, BG75, BG78, BG90, BG93, BG96, BG99, C0, C01, C02, C05, C07, Y15, and YR24.