Showing posts with label Power & Spark Challenge. Show all posts

Friday, September 7, 2018

Power Poppy's September Power & Spark Challenge~Let's Hit the Books!


Hello there and happy September to all of you!  Can you believe that we are already in to September?  Where did the summer go?   Although, I will miss those lazy summer days, I have to admit that I love Fall and all the wonderful things that come with the season!  Cooler temperatures, shorter days, falling leaves, football games, and the giddy feeling I get with the back to school rush.  Call me sentimental, but even after more years than I care to admit since I’ve been in school, I still feel the need to go shopping for pencils, pens, paper pads, books, and all of the fun little things that you do to prepare for a new school year!  It's also time for a new Power Poppy Power & Spark Challenge....and I get to be the hostess!  So how about a challenge that will inspire you to “Hit the Books”?  


You can use an image containing books, or how about a neat book print designer paper, or even create a book mark or book cover?  Whatever you decide, just make sure your inspiration is book related!  

So, for my project I decided to make a book cover and book mark.  Did you ever have to make book covers for your school books?  I used to look forward to covering and decorating my books each year!  I started by covering my little book with some craft wrapping paper and then made a belly band with a couple of patterned papers and some machine stitching for my book front.  Next, I printed an image and sentiment from Power Poppy's digital stamp set Apples in Season on to white card stock and colored it with Copics.  After die cutting my image, I layered it with some green card stock and adhered it to my book cover.


For my book mark, I die cut kraft and white card stock and stamped an apple image from the Farmer's Market stamp set and a sentiment from the Lilac Time stamp set.  After coloring the image with Copics, I assembled my book mark, added a bit of patterned paper and green card stock, and finished it with some ribbon.


Don't you just love those beautifully drawn apples and lovely sentiment?  The detail Marcella added to those apples is amazing!


I can't wait to curl up with my little book and "enjoy the moment"!  :)  That is all for my project today, but some of my Bloomie sisters have some lovelies to share with you so make sure you check them out and leave a little blog love while you are there.  I thank you so much for stopping by today and I hope that you will play along with us in our September Power & Spark Challenge this month.  Just link up your project on the Power Poppy blog for your chance to win a $50 gift code!  I can't wait to see what you create.  I hope you have a great weekend and I hope you will stop by again soon...until then, take care.  :)


Katie Sims <------You are here 
Stacy Morgan 


~Katie


Copic markers used for book cover:  R30, R32, R35, R37, R39, BV02, BV13, RV23, RV29, E40, E42, YG0000, YG21, YG61, YG63, YG67, YG91, G29, C00, C2, C4

Copic markers used for book mark:  R30, R32, R35, R37, R39, BV02, RV23, RV29, YG0000, YG21, YG61, YG63, YG67, G29, BG0000, BG000, B00, E40, E42, E44, E51, E55, E57, E59, 

Friday, June 9, 2017

Happy Power Poppy Friday!


Hello there and a very happy Friday to you!  I have a super quick post to share with you today featuring Power Poppy's new for June Power & Spark challenge.  This month's hostess is the amazingly talented and super sweet Julie Koerber!  You can read all of the details here.


Is that not the cutest challenge idea?  :)  So for my card, I ended up using three different stamp sets...Dynamic Duos: Glads and Gerberas, Nice Things to Say, and for my little bee image, Burst of Kindness.


I started by stamping my gerbera image, die cutting my rectangle and coloring it in with Copics.  Next I stamped my sentiment, sponged on some distress inks and tied a bit of string around the panel.  I also added some shimmer with my Wink of Stella clear brush pen.

Next, I trimmed some card stock and patterned papers, did some stitching, added some sponged distress inks and assembled all to my card base.  This card measures 3 1/2" x 5" .  Lastly, I added my image panel with some foam dimensionals.


I just love this image!!  It is such fun to color....that Marcella really knows her way around a bloom, doesn't she?  :)  Here's one last view....


So that is all for my card today, but some of my Bloomie sisters have created some beauties for your Friday inspiration.  Make sure you check them out and leave a little blog love while you are there.  Thank you so very much for stopping by today and I hope you have a wonderful weekend!  Until next time, take care!  :)


Cindy Lawrence    
Julie Koerber 
Kathy Jones 
Katie Sims <------You are here 
Stacy Morgan 
Tosha Leyendekker


~Katie


Supplies not listed above:  Paper-pink and white card stocks from PTI, patterned papers from Carta Bella's "Home Sweet Home" 6x6 paper pad; Ink-Memento's Tuxedo Black, Ranger Distress Ink in Iced Spruce, PTI's Chai and Chamomile inks; Other:  Spellbinders's A2 Matting Basics B die set, string from SU!, and these Copic colors- BG72, BG90, BG93, BG96, BG99, R30, R32, R35, R37, R59, RV10, RV11, RV14, RV17, Y13, Y19, YG01, E000, E00, E41, E43, E44, BV01, and W1.

Friday, March 3, 2017

Are You Ready for Power Poppy's March Power & Spark Challenge?


Hi there and Happy Friday to you!  I am so glad you could stop by today.  It is time for Power Poppy's March Power & Spark challenge and I get to be the hostess this month!  So can you guess what the theme is? ;)  Let's take a peek at the details, shall we?


Yep, Let's Go Green!  I really was inspired by Pantone's 2017 Color of the Year~Greenery.  Here's a little bit about the challenge....

In honor of Pantone’s 2017 Color of the Year choice, “Greenery”,  let’s create projects featuring green!  
Here is an excerpt from Pantone’s  description of “Greenery”…

Greenery is a fresh and zesty yellow-green shade that evokes the first days of spring when nature’s greens revive, restore and renew. Illustrative of flourishing foliage and the lushness of the great outdoors, the fortifying attributes of Greenery signals consumers to take a deep breath, oxygenate and reinvigorate.

Now, doesn’t that sound like a color highlighting the Power Poppy vibe?!  I think so!  So, let’s go wild with green! But, you don’t have to limit yourself to just using the color green!  You can also “Go Green” by using a "recycled" element on your project.  However you choose to play along, just make sure you show us your green!


So, are you up for the challenge?  I hope so, 'cause we would love to have you play along this month....and the best part is, if you share your creation with us on the Power Poppy blog, you could win a prize!  Yay!  :)

So lemme show you my card for the challenge...


There's a bit o'green there, I would say...lol!  I started by printing the darling digital image Wish You Luck on to some Papertrey Ink Rustic White card stock and coloring it up with Copics.  Next, I die cut my image and also some additional die cut layers in a mix of papers.  As you can see, I pulled out the big guns for this one....my highly coveted Marianne Design die set in Anja's Square.  Sigh...yep, I still hear angels sing when I use this one...and now maybe a bagpipe, lol!  

Anyway, I couldn't resist adding some gold leafing with my Krylon 18KT Gold Leafing pen then some shimmer to the shamrock blooms with some Martha Stewart clear glitter.  And because I just had to add the "one more thing"....I added some wee little pearls to the centers of the shamrocks.


One way to really add some dimension when you are coloring up a bouquet of the same bloom is to grab your darkest color that you are using and color in between the blooms.  That will instantly pop out the blooms in the foreground giving you instant depth.  Really...it works like a charm every time!  You could even say, it works like a lucky charm.....hee!  Ok, I couldn't resist that one!  ;)

I sized and printed the sentiment from the same digital set and die cut it with a fishtail banner.  


One last close up to show off Marcella's handiwork.  Isn't it something how she always manages to give us these glorious images and also pairs them up with sweet sentiments in darling fonts?!  I know, right?

Ok, so that is all for my card today, but some of my Bloomie sisters have worked their magic and created cards for your Friday inspiration.  Make sure you check them out and leave them a little blog love while you are there.  Then, c'mon and play along with us!  We would love to see what you create.  I am so glad you were able to visit today and here's wishing you luck on your challenge entry!  Until next time, take care.


~Katie

Supplies not listed above:  Paper-Papertrey Ink's Spring Moss, Graphic 45's "Twelve Days of Christmas" 6x6 paper pad; Other-Spellbinders Standard Circles Large, Classic Scalloped Circles Large, and Blossom Three die sets, Papertrey Inks Tag Sale Quilted die, Ranger Distress Ink in Weathered Wood, PTI's Chamomile ink, and these Copic colors: YG21, YG61, YG63, YG67, G29, V93, BV20, BV23, and BV25.

Friday, February 3, 2017

Happy Power Poppy Friday with February's Power & Spark Challenge!


Hi there and a very happy Friday to you!  Do you have big plans for the weekend?  Any crafty time set aside?  I wanted to share a card I made for the newest Power Poppy Power & Spark Challenge hosted by the incredibly talented and super sweet Copic Diva, Cindy Lawrence.  She has really thrown down quite a challege....just take a lookie....


Ok, so time for a true confession here...I have never tried the no line coloring technique.  Nope, never.  To be honest, it has always scared me to pieces.  I am and always have been a color in the lines kinda girl....I need my lines....lol.  So, this really was quite a challenge for me but I swallowed hard and plunged ahead.  I have to say, I really enjoyed the process.  I spent a good bit of time coloring my image but it was a learning process. 


I started by using a second generation stamping of an image from the Dream Wedding stamp set using Memento's Tuxedo Black ink on to some Rustic White card stock from Papertrey Ink.  I colored my image with a ton of Copics....I am a little embarrassed to list them all, but I will list them below.  Next, I stamped my sentiment from the same stamp set with PTI's Smokey Shadow ink.  Then, I die cut my image with a My Favorite Things die, sponged on some Ranger Distress Ink in Iced Spruce, and layered it with a die cut panel from another My Favorite Things die.  I trimmed a white card stock panel, rounded the top corners, stitched a bit of patterned paper, spritzed a few inks around, added some PTI Chai and Chamomile distress inks along some edges and then adhered my layered image.  A silver cord bow finishes off the panel....all that was left was to adhere the assembled card front to my card base.  As an afterthought, I pulled out my Wink of Stella clear brush pen and added a little shimmer to the cake which led to me pulling out my Copic Opaque White to add a couple of highlights to my finished image.


Leave it to Marcella to imagine the ultimate botanical wedding cake!  Wouldn't you just love to see one of these in real life?!  


One last parting photo of Marcella's dreamy cake.  What fun this was to color up!  

So that is all for my card today, but several of my Bloomie sisters have created some show stoppers for your no line coloring inspiration.  You do not want to miss a single one of these beauties...trust me.  Make sure you leave them a little blog love as you visit and then why don't you join along in our new challenge?  When you are done, link up your photo to the  Power Poppy blog post for a chance to win a prize!  

I am so glad you could stop by today.  I hope you have a great weekend and until next time, take care....

Cindy Lawrence      
Katie Sims <------You are here 
Stacy Morgan 


~Katie

Supplies not listed above:  Paper-PTI's Ocean Tides card stock, My Mind's Eye's The Sweetest Thing Bluebell 6x6 paper pad; Copic colors- E40, E41, E43, E44, C0, C1, C3, C5, C7, W0, W1, W4, W5, Y08, YG0000, YG11, YG17, YG21, YG23, G20, G21, G24, G28, V91, V93, V99, RV10, RV52, RV55, RV66, RV69, BV08, BV13, BV34, B63, B66, and B69.

Friday, January 6, 2017

Happy Power Poppy Friday and a New Power & Spark Challenge!


Hi there and Happy Friday to you!  Are you ready for the weekend?  I know I am!  Today I have a card to share for Power Poppy's very first Power & Spark Challenge for 2017!  Our lovely and super sweet CAS card queen, Stacy Morgan, is the hostess this month and her challenge is Winter Blooms.  Just take a lookie at this....


Here is what Stacy has to say about her challenge:

"When winter comes, many of us long to say goodbye to the chill and say hello to those cheerful and fresh spring flowers! Did you know there are lots of blooms that sprout at the end of winter (you can cheat and include early spring as well)? How about camellias, crocus, paperwhites, holly, snowdrops, or poinsettias? Let's see how you can bring these pretty little petals and glorious greens to life and enjoy this last bit of winter as well!"

To make it super easy for you, here is a direct link of all Power Poppy winter blooms! 


For my card, I chose to use the gorgeous Simply Camellias stamp set.  I also used a sentiment from Tea in the Garden stamp set.  


I started by stamping my image with Memento Tuxedo Black ink and die cut it out with a die from My Favorite Things, Die-namics Cross Stitch Rectangle.  Next, I colored the image in with Copics and added a little gold leafing with my Krylon 18KT Gold Leafing pen.  After that, I die cut out my card base and a stitched panel using a Papertrey Ink die set, Noted: Scalloped A2 Vertical Die.  I also trimmed a couple of extra layers of paper using a paper trimmer.  I used some Chamomile and Chai ink from PTI to age the edges a bit.  Next, I started adhering my layers together, added some ribbon, button, and twine and then adhered it to my card base.  To finish off my image, I added some fine glitter to some of the petals then attached it to my assembled card.  There was no need for any stitching on my card, the dies did a beautiful job instead!  :)


Mercy, how I love camellias!  I actually have a few blooms on one of mine now!  I can never get enough of all of the glorious detail Marcella puts in each and every bloom.  What a dream this beauty is to color up!


Here is one last peek at my card.  The patterned papers are from  Anna Griffin's "Calisto" 5 x 7 paper pad I recently purchased.  I certainly hope that you enjoy this day and your weekend!  Please make sure you hop around and see what many of my incredibly talented Bloomie sisters have created for your Friday inspiration and then c'mon and play along with us this month for Stacy's wonderful challenge!  Don't forget to link up a picture of your card to the Power Poppy Blog for a chance to win a prize!  Thank you so much for stopping by and I hope to see you around again soon....until then, take care!

Cindy Lawrence    
Julie Koerber 
Kathy Jones 
Katie Sims <------You are here 
Stacy Morgan 
Tosha Leyendekker

~Katie

Supplies not listed above:  Paper-Rustic White and Spring Rain card stock from Papertrey Ink; Other- Spring Rain ribbon, fine linen button and scrap twine from PTI and these Copic colors:  BG0000, B000, B91, B95, E0000, E000, E41, E44, BV11, BV13, RV10, RV21, RV25, RV29, Y35, G29, YG61, YG63, YG67, and YG91.

Friday, June 3, 2016

Happy Friday with a NEW Power Poppy Power & Spark Challenge!


Hi there and happy Friday to you!  I hope this day finds you well!  I wanted to share a little card I made for this month's Power & Spark Challenge at Power Poppy.  Our hostess this month is the ever so talented, super sweet, and power house marathon runner, Cindy Lawrence!  Is there anything this girl can't do?  I think not....lol!  :)  You go, Cindy!  She has come up with an awesome challenge for us....just take a lookie......


Here is what Cindy says about her challenge:

The Happy Mail Challenge! How many times have you created a card only to have it sit in a basket waiting for that perfect occasion? This time, let’s flip that around and create a card with someone in mind and then, slap a stamp on that baby and put it in the mail! Keep in mind, we want this to be a card “just because.” Sure special occasions are important, but we want this one to be about simply sharing the love – not for birthdays or graduations or anniversaries—a “just because you care” kind of card for someone you’ve had on your mind. The challenge runs through June 30th at 8PM EST for a chance at a Power Poppy stamp set of choice. The Challenge kicks off Friday, June 3rd.

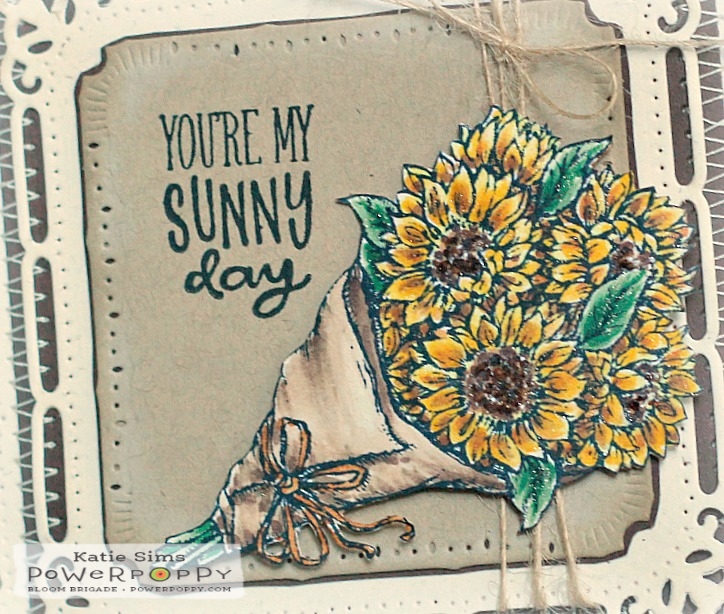
Now how fun is that?!  I am so guilty of not sending cards "just because" and honestly, aren't those the best kind?  So, I pulled out a set I haven't used in a while, Sunny Harvest, and went to work...


I even took my photos outside on my front porch this morning....it is supposed to be a sunny day today!  :)  I stamped my image with Memento's Tuxedo Black ink onto some Rustic Cream card stock from Papertrey Ink and colored it with Copics.  I added a little shimmer with my Wink of Stella Clear Brush pen and some shine with a  Sakura clear glaze pen.  After fussy cutting it out I set it aside and die cut the layers for my card using Spellbinders Marvelous Squares die set, more of the cream card stock and a bit of kraft card stock.  I added some trimmed layers in a chocolate brown to give a little more depth of color to the card base.  After sponging on  PTI's Chamomile, Chai, and Vintage Cream inks, I did some stitching, stamped my sentiment from the same set, assembled my layers, added the twine and then adhered my fussy cut image with foam dimensionals.


I just love this sweet sentiment and the darling bouquet of sunflowers was super fun to color.  Now, all that's left is to put it in an envelope, stamp it, and send it off to a sweet someone.....just because.  Thanks again, to Cindy, for such an awesome challenge!  Would you like to see some of the amazing creations my Bloomie sisters have created for your inspiration?  Well just hop on over to each one and make sure you leave a little blog love while you are there!  I am so glad you could stop in for a bit today!  I hope you have something fun planned.....as for me, I am going to enjoy this sunny day in  my yard by planting dianthus, coral bells, and hostas!  Until next time, take care!  :)

Oh shoot....I almost forgot some BIG news!!!  Power Poppy is being featured on the Passionate Paper Creations and Friends Facebook page here.  In honor of this special occasion, Power Poppy will be having a little contest.  Check this out!


Power Poppy's Color Your Way to Win
Play along and be a Power Poppy Peep all weekend long! Grab your favorite coloring medium and let’s see what you’ve got. Feeling fruity? Ready to Blossom? Need to crank up the tunes? We feel your passion! Now, put it on paper and show us your finished colored Power Poppy image. Put your link as a comment in this post on Passionate Paper Crafters & Friends' Facebook page and we’ll draw one lucky winner to nab a $25 gift code to the Power Poppy Shop. Want to stock up on Power Poppy stamps to play along? Enter discount code MORECOLOR at checkout to get 10% off any clear or digital stamp sets that your little heart desires! We can’t wait to see what you pick and help make blossom with your creative skills. Come see us at powerpoppy.com
AND....one more thing....we will have a new digital release on June 5th....so keep a look out for that!  
Even more inspiration to play along with us this week, right?  Happy coloring!  :)

Cindy Lawrence    
Julie Koerber  
Katie Sims <------You are here 
Stacy Morgan 
Tosha Leyendekker

~Katie

Copic colors used:  YG61, YG63, YG67, E40, E43, E44, E47, E55, E57, E59, E79, Y13, Y15, E18, and YR27.

Friday, May 6, 2016

Happy Power Poppy Friday with a NEW Power & Spark Challenge!


Hi there and welcome!  I am so glad you could pop in for a visit!  Today I get to share a new Power Poppy Power & Spark Challenge with you!  I just so happen to be hosting May's challenge and I couldn't help but remember the adage, "April showers bring May flowers" so this challenge is to highlight a Marcella floral.  Hmmmmm, that will be a toughie, huh?  LOL.  The real challenge here is you have to declare a favorite...yep, choose your very favorite Power Poppy floral image to highlight on your card or project.  Choose a favorite....can it really be done?  Well, we are about to find out!  ;)


For my card, I used the Azalea stamp set for my image and the Best Day Ever set for my sentiment.  I have to say that I l-o-v-e every single one of Marcella's images but this one absolutely holds a very special place in my heart.  Living in Georgia, you can imagine that azaleas are a cornerstone to any landscape.  Matt and I particularly love them so we pretty much dedicated our front yard to the many different varieties of azaleas....at last count we had 74.  They have different bloom times so we end up seeing some sort of azalea blooming from around March until November!  Throw the camellias in the mix and we have something blooming pretty much all the time.  My daddy used to love red azaleas so that is how I chose to color this one up today....


I stamped my image and sentiment using Memento's Espresso Truffle ink onto Papertrey Ink's Rustic Cream card stock that was die cut with a die from Spellbinders' A2 Matting Basics A set.  Next, I colored my image with Copics, adding a little sponging with Ranger's Distress Ink in Iced Spruce.  I added some gold leafing with my Krylon 18KT gold leafing pen and then sanded the edges to distress the gold a bit. Next, I added a few strokes of my Wink of Stella clear brush pen to give those azalea petals some shimmer.  Then, I layered a Stitched Mini Scalloped rectangle die cut from My Favorite Things.  After that, I pieced together the next layer using papers from an old Basicgrey "Picadilly" 6x6 paper pad that I cut into random width strips.  I adhered them to more of the PTI card stock and then added some stitching to give it a quilty feel.  I feel pretty sure that quilty is not a true word, but it should be....don't you think?  :)  I wrapped some ribbon in "Fine Linen" from PTI around the layer and added a button and twine. Before I adhered my assembled image panel, I used a small Stampin' Up! circle punch to notch out a spot so I could nestle the panel up to my bow.  Lastly, I adhered it all to my 4 1/4" x 5 1/2" card base.


Is that not the most beautifully drawn azalea image of all time?  Marcella, I cannot thank you enough for bringing this bloom to life in a stamp.  Since I am highlighting azaleas today, I thought I would share a couple of pictures of azaleas from my yard this Spring....you probably noticed a couple of  the blooms in my card pictures....


This is a mix of two azalea varieties and a camellia that I managed to sneak in here.  :)  The white blooms are Gumpo White....a satsuki variety of azalea.  The pink bloom is a Wakaebisu, another satsuki variety.  Both of these are considered late bloomers here...both of these are just starting to bloom here.  The red bloom is actually a lone camellia bloom.  The camellias have been spent for a while but lo and behold, I saw this single blossom when I was gathering some azaleas for this photo so I just had to add her!  I just love the form of this bloom.....the tight cluster of center petals slightly resembles a carnation.  The name of this camellia variety is a japonica (large leaf variety that blooms around January here) and this particular japonica is called "Professor Sargent".  The deep red is truly stunning.  We have two of these espaliered next to our house at the front walk and when it is in full bloom it looks like a wall of red roses from a distance.  


Here is a photo of part of our front yard from this past early April when our Indica azaleas are in bloom.   The white blooms are called "Mrs. G.G. Gerbing" and the purple blooms are called "Formosa".  These azaleas are about five years old now and they will get quite large.  You can see a few dark pink blooms...those are from our Encore Azaleas "Autumn Rouge"....they bloom three times a year for us here and are a deep pink.  You have probably spied a few weeds here and there that made their way to the surface....I am a little mortified about them being in the photo, but let's just pretend those aren't there!  ;)  I fell behind in my gardening duties....lol.  On the far left is one of our Japanese Maples "Crimson Queen"...the leaves start out dark red to burgundy but in the summer heat they turn green then in the fall they darken back up before shedding them for winter.  You might also see a few dogwood blooms on one of our trees....they were just starting to bloom at this time.

So, that was a little more than you bargained for, I'm sure.  Thank you for indulging me with these photos....like I mentioned earlier, we are big azalea fans around here.  Well, that is all for my card today but some of my incredibly talented Bloomie sisters are playing along today so make sure you check out their lovely creations and leave a little blog love for them while you are there.....then, why don't you play along with us too?   You have all month to ponder on what your favorite Power Poppy floral is and create a project using that image.  Make sure you link up your project on the Power Poppy blog for a chance to win a stamp set of your choice!  :)  I can't wait to see what you create!  Thank you again for stopping by....I love your visits!  Until next time, take care!  

Cindy Lawrence    
Julie Koerber  
Katie Sims <------You are here 
Stacy Morgan 

~Katie

Copic colors used:  R11, R12, R14, R17, E70, E74, E79, YG21, YG61, YG63, YG67, YG91, G29, B000, B0000, and BG10.